

SIMPLUS GARMENT STEAMER GTJH026 User Manual
Ⅰ. Product Specifications
| Product Name | MODEL NO | Rated Power | Rated Voltage | Rated Frequency |
| GARMENT STEAMER | YT-818 | 2000W | 220-240V | 50/60Hz |
Ⅱ.Product Diagram
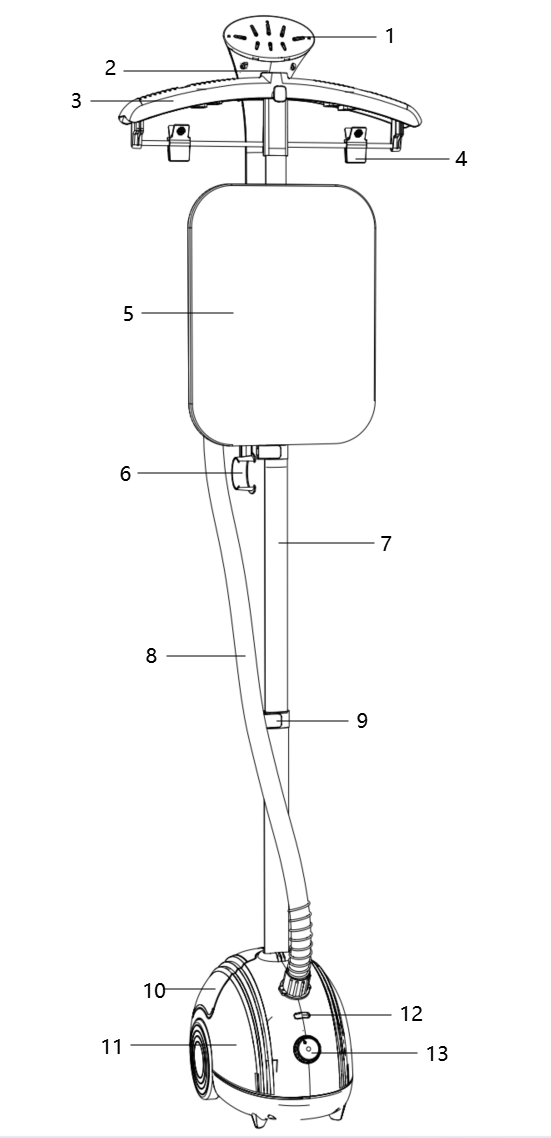
1. Steam Head
2. Steam Head Holder (1)
3. Garment Hanger
4. Hanger Clips
5. Ironing Board
6. Steam Head Holder (2)
7. Telescopic Pole
8. Steam Hose
9. Pole Clip
10. Water Tank
11. Main Unit
12. Indicator Light
13. Control Knob
Ⅲ. Operating Instructions
Main Unit Installation:
Note: Do not connect to power before installation.
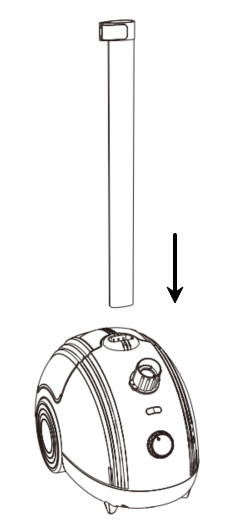
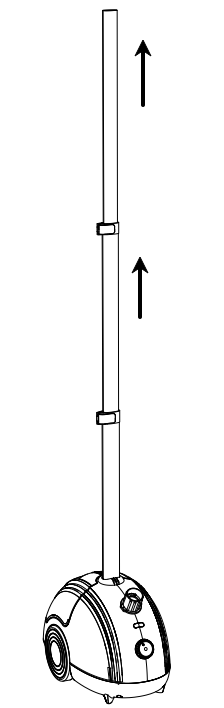
- Take out the telescopic pole. Insert the flat side into the top of the main unit. Open the first and second pole clips in sequence, extend the pole, then lock the clips.
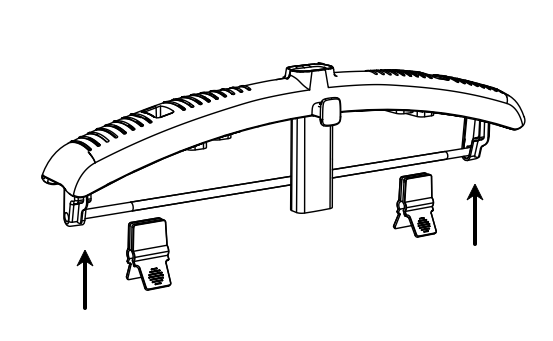
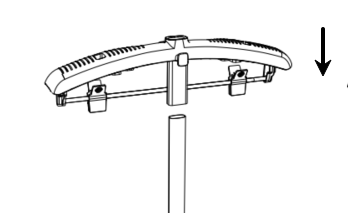
- Take out the garment hanger and two hanger clips. Attach the clips to the hanger bar, then install the hanger onto the top of the telescopic pole. Press firmly to secure.
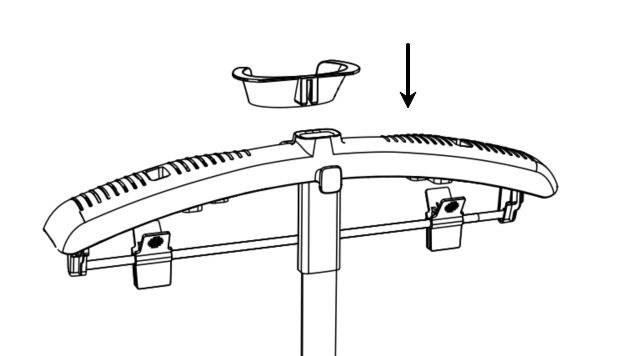
- Take out Steam Head Holder (1) and align it with the hanger slot. Push it in until it is fully secured.
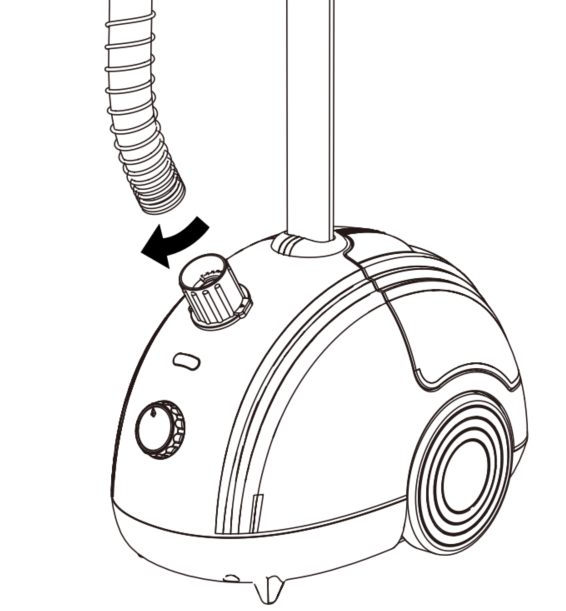
- Connect the steam hose to the main unit port. Press firmly, then turn the knob clockwise to lock it in place.
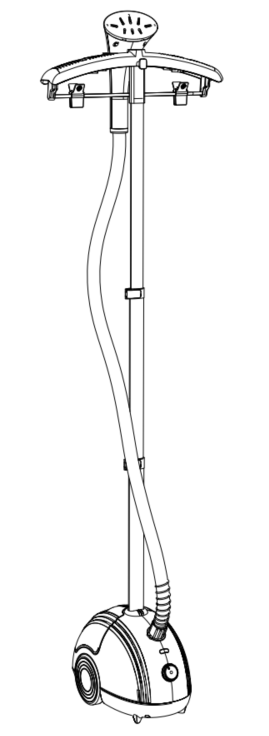
- Finally, place the steam head onto the holder. Installation is complete.
Ironing Board Installation:
- Take out the ironing board from the package. There are three mounting slots on the back:
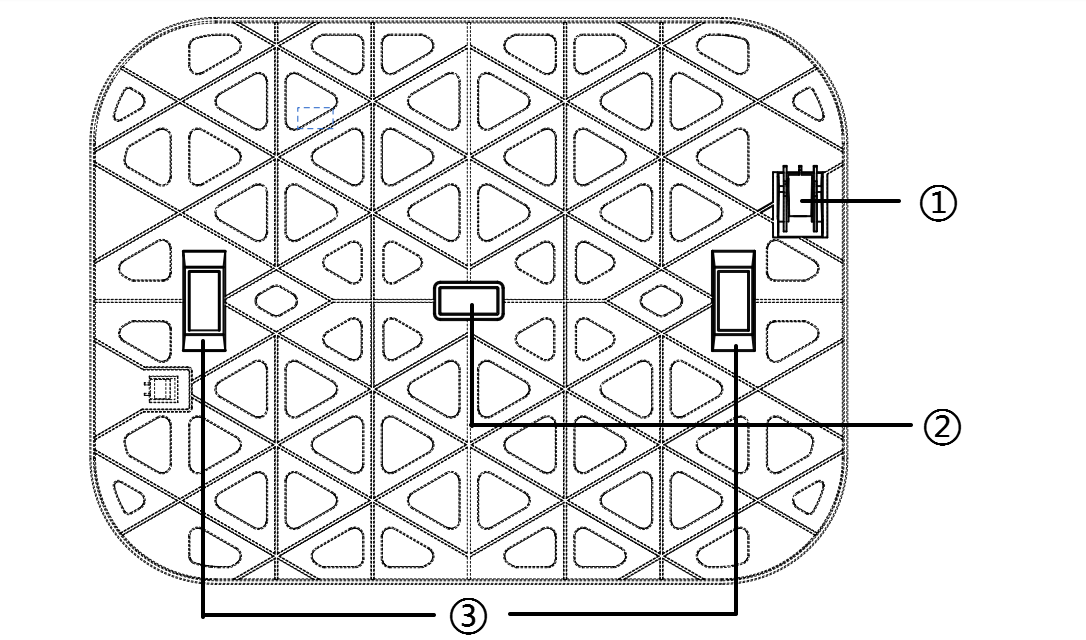
- Steam Head Holder Slot
- Flat Ironing Slot
- Vertical Steaming Slot
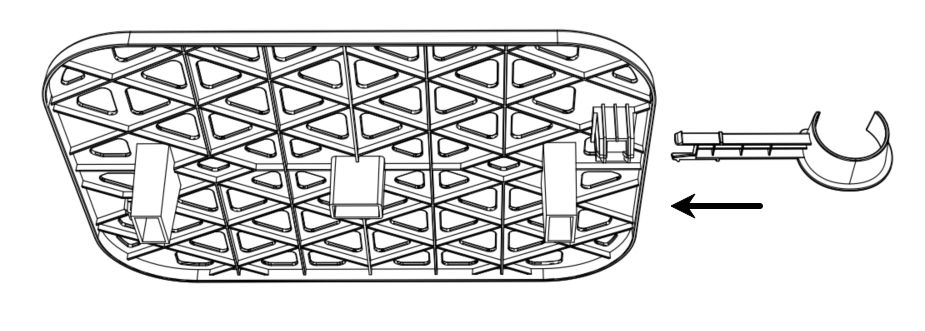
- Take out Steam Head Holder (2). Align it with the Steam Head Holder Slot on the ironing board. Squeeze the holder and push it inward until it locks into place.
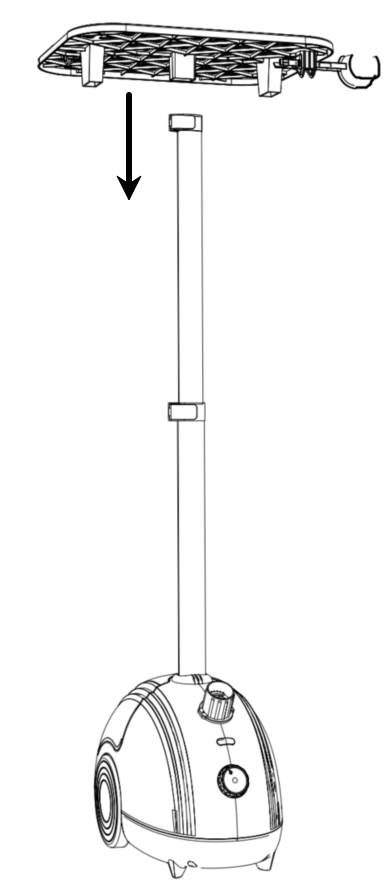
- For flat ironing, align the Flat Ironing Slot on the ironing board with the top of the telescopic pole, then push firmly to secure.
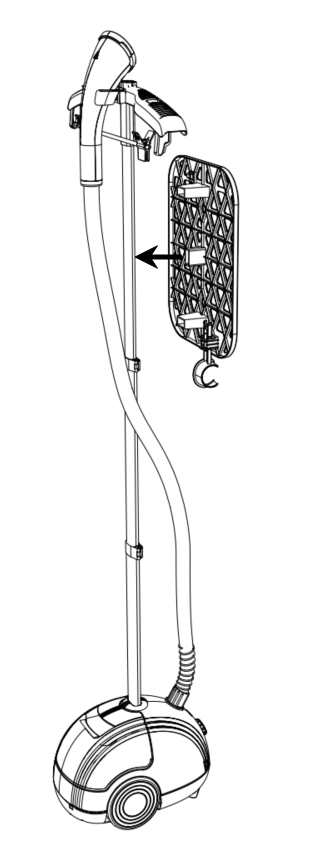
- For vertical steaming, align the Vertical Steaming Slot on the ironing board with the telescopic pole at the hanger, then snap it into place.
2. Usage Instructions
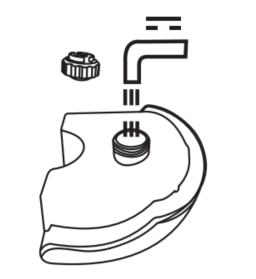
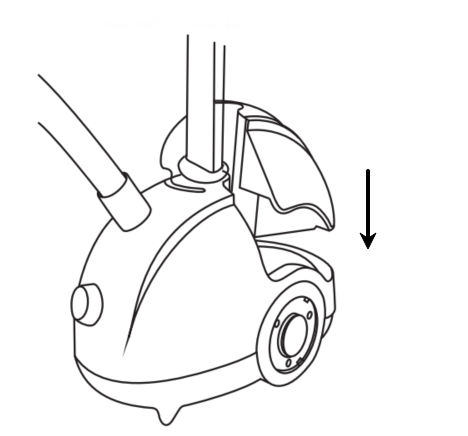
- Unscrew the water tank cap. Fill the water tank with water, then tighten the cap securely.
Note: Use distilled or purified water only. Do not add detergents, essential oils or any chemical agents.
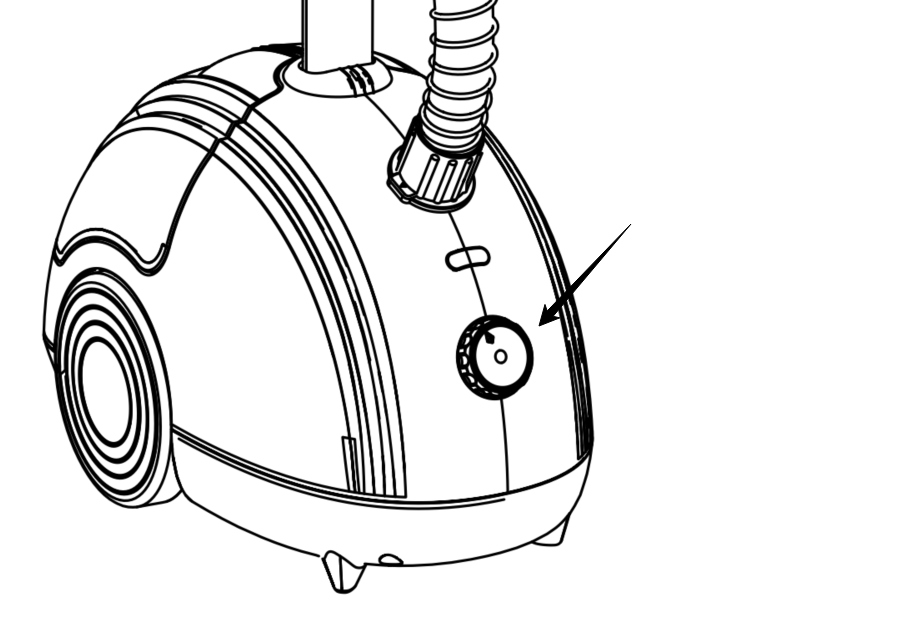
- Plug in then turn the control knob to power on and select a setting. The indicator light will turn on.
- After powering on, wait about 30 seconds for high-temperature steam to be released, then start steaming garments.
Note:
- Use distilled or purified water only. Do not add detergents, essential oils or any chemical agents.
- When using the ironing board for flat ironing, adjust the telescopic pole so the ironing board is about 80 cm above the floor. A “gurgling” sound during low-height use is normal. If this occurs, lift the steam head briefly, then continue steaming.
- When lifting the steam head, steam may suddenly flow more strongly and release hot water droplets. Please use caution to avoid burns.
- Do not aim at people, animals, or flammable materials.
- Do not steam garments while they are being worn.
- Be careful to prevent steam splashes during use.
- During operation, do not touch the high-temperature steam or steam panel.
- Do not place the steam hose on the floor or bend it sharply. Do not remove the steam hose during operation. If disassembly is required, unplug the unit first. Allow the hose to cool to room temperature and ensure no water remains inside before removing it.
- Do not place the unit directly on heat-sensitive surfaces such as glass to avoid potential hazards.
Ⅳ. Cleaning and Maintenance
- Unplug the unit before cleaning and allow it to cool for at least 30 minutes.
- Remove the water tank. Unscrew the water tank cap, empty the water, then rinse the tank with clean water.
- After fully draining, reinstall the water tank onto the main unit.
- Unscrew the drain nut at the bottom of the main unit. Place a container underneath to collect wastewater, then drain all remaining water. Tighten the drain nut securely after finishing.
- Wipe the exterior of the main unit with a damp cloth.
- Do not fill the water tank with hot water or corrosive cleaning agents, as this may damage the unit.
- Drain the water tank and ensure all parts of the product are completely dry before storage.
- For long-term storage, keep the product in a dry, cool place. Avoid areas with excessive dust, high temperatures and direct sunlight.
Ⅴ.Warning
For safety assurance, this product complies with all applicable standards and regulations. Read this manual carefully before using the product and keep it for future reference.
- This product is not intended for use by persons with physical, cognitive, or mental impairments, or those lacking knowledge and experience, unless supervised and instructed by a person responsible for their safety.
- Do not allow children to play with this product.
- Keep it out of reach of children.
- Before use, ensure the marked voltage of the product matches the local supply voltage. Only use the original or manufacturer-specified power cord and charger.
- Do not use the product if the plug, power cord, or the product itself is damaged, cracked, or leaking electricity. Do not disassemble or modify the product by yourself. Contact customer service immediately if any abnormality occurs.
- Do not plug in/unplug the power cord or operate the appliance with wet hands.
- If the appliance emits smoke, unusual odor, overheats or deforms during operation, turn off the power immediately and stop using it. Contact customer service if needed.
- This product is for household use only. Do not use it for commercial, professional purposes or any function not specified in this manual. Improper use will void the warranty, the manufacturer will not be liable for any resulting losses.
- Always supervise the appliance during use. Do not leave it running unattended. Disconnect the power supply before leaving, assembling, disassembling, cleaning or servicing the product.
- Avoid direct skin contact with high-temperature parts to prevent burns.
- Fill the unit with cold water only before use. Do not use hot water, as it may damage or deform the water tank. Always monitor the water level during operation.
- Unplug the unit before filling or draining water. Do not allow water to splash during operation.
- Turn off the power and unplug the unit before cleaning, moving or when not in use.
- Do not place the unit near flammable materials.
- Keep the steam hose and steam head above waist level to ensure smooth steam flow. A “gurgling” sound may occur if the hose is positioned too low. Do not insert any objects into the steam hose or openings.
- Use of non-original accessories may cause fire, electric shock or damage to the unit.
- Due to factory testing, a small amount of residual water or moisture may remain in the water tank. This is normal and does not affect performance.
VI.Common Issues
| Problem Symptom | Possible Cause | Solutions |
| No Power | The power plug is not fully inserted. | Reinsert the plug into the socket. |
| The power outlet is not working. | Turn on the socket switch or use another outlet. | |
| No Steam | Boiler is not fully preheated | Wait for 1 minute. Use the unit after the indicator light turns off. |
| Steam hose is blocked or kinked | Contact customer service. | |
| Water pump failure | Contact customer service. | |
| Indicator light on | Boiler is heating. | Please wait for 1 minute until the light turns off automatically. |
| Indicator light off | Boiler heating is complete. | The indicator light turning off means preheating is finished and steam function is ready for use. |
| Water Leakage / Water Spray | Boiler not fully heated (indicator light on) | Wait for 1 minute. Use the unit after the indicator light turns off. |
| Water not fully vaporized inside the hose | Continue using the unit for a short period. | |
| Intermittent use causes water to cool inside the hose | Continue using for a short period. | |
| Water tank seal not properly installed | Reinstall the water tank seal. | |
| Water tank damage | Contact customer service for replacement. | |
| Gurgling Sound | Steam head positioned too low | Adjust the telescopic pole so that the ironing board is about 80 cm above the floor. A “gurgling” sound at low height is normal. If this occurs, briefly lift the steam head, then continue steaming. |
| Steam hose deformation | Deformation caused during transportation, storage or packing. | This is normal. The hose will return to its original shape after heating as the material softens. |