Ⅰ. Product Parameters
|
Product Name |
MODEL NO |
Rated Power |
Rated Voltage |
Rated Frequency |
|
Dehumidifier |
OL20-BD068MNF |
330W |
220-240V~ |
50/60Hz |
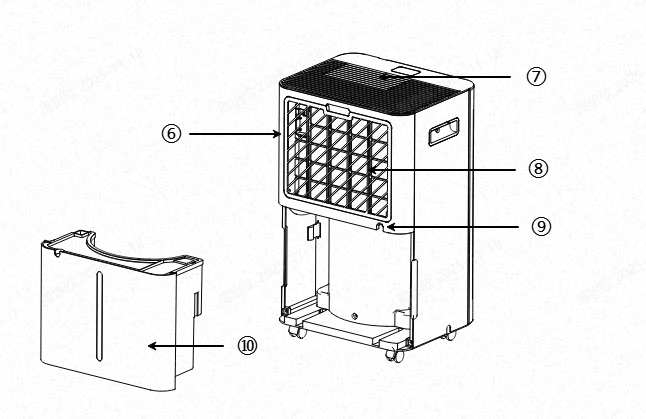
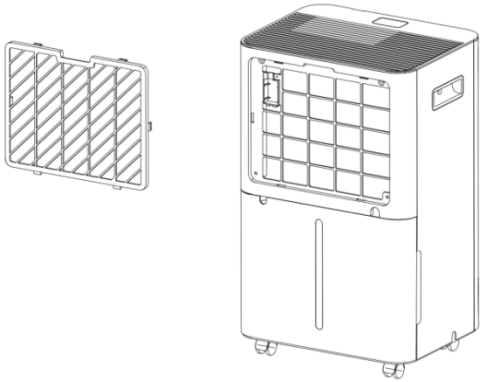
Ⅱ. Product Illustration

①Control Panel
②Front Cover
③Swivel Caster
④Handle
⑤Light Strip
⑥Rear Cover
⑦Air Outlet
⑧Air Filter
⑨Drain Outlet (Hose Connectable)
⑩Water Tank
Ⅲ. Operation Instruction
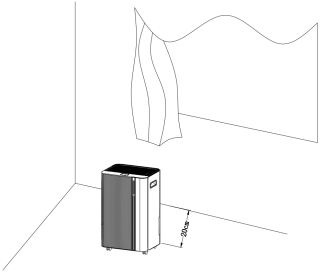
3.1 Installation Instruction
- After unboxing, inspect the device to ensure there are no damages or scratches.
- Allow the product to stand upright for 24 hours before use.
- Place the device on a sturdy, flat surface with at least 30 cm of clearance around it for proper air circulation.
- Ensure the water tank is installed correctly, otherwise, the device will not start.
Warning: 1. This equipment must only be placed in rooms larger than 4㎡.
- Do not place the equipment in areas where flammable gas leaks may occur.
3.2 Control Panel

Function Buttons and Indicator Lights
|
1. |
Power Button |
Turns the device on or off. |
|
2. |
Mode/Sleep Button |
Short press to switch between auto/dry modes; long press to enter sleep mode. |
|
3. |
Set Button |
Short press to set humidity/timer; long press to display real-time temperature. |
|
4. |
Timer/WiFi Button |
Short press to set timer; long press to connect to WiFi. |
|
5. |
Speed Button |
Adjusts fan speed. |
|
6. |
Ion / Lock Button |
Short press activates negative ions mode; long press activates child lock. |
|
7. |
LED Display |
Show humidity, temperature, mode, timer setting, etc. |

Power
Press to turn the unit on/off. When the device starts, the operation indicator light up, defaulting to high fan speed with a humidity setting of 50%. While the device is running, press the power button to shut it down. The operation indicator turns off, the compressor stops immediately, and the fan continues for 30s before stopping.
![]()
Mode/Sleep
Short press to switch between auto/dry modes; long press to enter sleep mode. Long press to switch to sleep mode, with the corresponding indicator light illuminating.
Auto Mode
- When environmental humidity exceeds the set humidity +3%, the unit activates at the preset value.
- When environmental humidity falls below the set humidity -3%, the unit stops operating. The fan ceases after a 30-second delay.
- After stopping, operation resumes when environmental humidity exceeds the set humidity +3% again, cycling automatically for dehumidification.
- Both fan speed and humidity settings are adjustable in Auto Mode.
- After humidity is set, the LED light returns to showing environmental humidity.
Dry Mode

- The device operates continuously, unaffected by environmental humidity.
- Fan speed is adjustable; humidity settings are fixed.
Sleep Mode

- Long Press the Mode button to switch to Sleep Mode.
- In Sleep Mode, the display will automatically turn off if no operation occurs within 10s.
- Press any button to restore normal display.
- Other functions remain identical to Auto Dehumidification mode.
- In Sleep mode, when the water tank is full, the device will not sound an alarm but will display “88”.
- After the water overflow error occurs, empty the tank and reinstall it.

Set
- In Auto Dehumidification mode, set humidity levels. After selecting the timer function, set the time.
- To adjust humidity, press the button once to increase the humidity value by 5%.
- To set the timer, press the button once to increase the timer value by 1h.
- Long Press to display the real-time temperature flashing. After 5 seconds, it will return to displaying the real-time humidity.
Timer/WiFi
- Short press the timer button to set timer/check timer/cancel timer
- Long press to set to connect to WiFi.
- In Non-Timer Mode: Press the timer button to enter timer setup mode. The digital display flashes to show the timer duration.Time While the display is flashing, press the adjustment button to set the timer duration (0–24 h).
- In Timing Mode: Press the timer button to display the remaining time on the flashing digital screen. Press the timer button again while the screen is flashing to cancel the timer.
- In Off Mode: Press the timer button to set the power-on time. In On Mode: Press the timer button to set the power-off time.

Speed
Switch between Low and High speeds; the corresponding indicator light illuminates.

Ion / Lock
Short press activates negative ion purification. Long press for 3s activates lock mode, with the indicator light illuminating. All buttons except this one become inoperable. Long press again for 3s to deactivate lock mode, and the indicator light will turn off.
3.3 Tri-color LED Strip:
- Blue: Dry, environmental humidity <46%
- Green: Comfortable, 46% < environmental humidity < 66%
- Red: Wet, environmental humidity > 66%
3.4 Water Tank Full Alarm
Water Tank Indicator Light
- After the water tank fills for 5 seconds, the unit will sound an alarm. The water tank indicator light turns red, the unit emits 5 beeps, and the display shows the FL error code.
Alarm Reset
- Press any button during the beeping to stop it. The compressor and fan will stop running.
3.5 Drainage
Two ways to remove accumulated water from the device based on usage scenarios.
- Water Tank Storage: Manually empty the tank.
- Direct Hose Connection: Connect a drain hose to discharge condensate without emptying the tank.
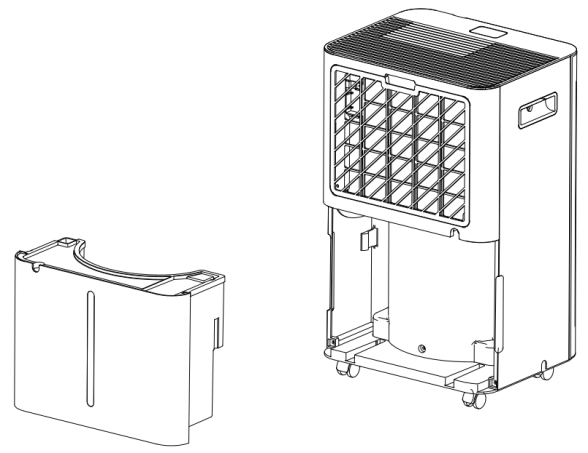
3.5.1 Water Tank Storage
The internal water tank automatically collects condensate and shuts off the unit when full. After proper installation and emptying, the unit will resume operation.
- When the tank is full, the unit will emit a humming sound, the “Water Full” indicator will illuminate, and the display will show the FL error code.
- Pull the tank to remove it from the device.
- Drain the water into a drain or bucket.
- Clean the tank inside and outside.
- Reinstall the empty tank into the unit.
- If the “Water Full” indicator does not turn off, check that the tank is properly installed.
3.5.2 Direct Connection of Hose
For continuous dehumidification, connect the included drain hose to the device to automatically discharge condensate.
Drain Hose Installation Cautions
- Place the device on a level and stable surface.
- Turn off the device before operation.
- Insert the drain hose into the machine's drain port and secure the connection;
- Ensure the drain hose is straight without kinks;
- The drain outlet must not be higher than the machine's drain port;
- Place the drain hose outlet directly to sewer or outdoorsDrainage;
- Do not coil the drain hose inside a storage container. Without air pressure, water cannot flow out, causing machine overflow;
- Installation diagram as follows:

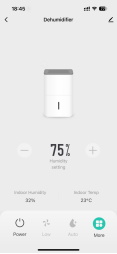
3.6 Smart Life APP Connection and Usage
The Smart Life APP supports Android and iOS systems. Scan the corresponding QR code to directly access the download page.

Wi-Fi Connection Method
This device connects via router Wi-Fi. Ensure the Smart Life APP is installed and a user account is created.
Place the device approximately 5 meters from the router.
After powering on, press and hold the Wi-Fi button to connect. If network configuration fails within 3 minutes, the process will automatically cancel and the indicator light will turn off. To reconnect to Wi-Fi, lomh press the Wi-Fi button for 5s to initiate network setup; the Wi-Fi indicator light will flash again.
Method 1: Bluetooth Connection
Open Bluetooth on your phone or other device. When the Wi-Fi indicator flashes, open the Smart Life app and the device will automatically connect by Bluetooth.
Method 2
When the Wi-Fi indicator flashes, select “Add Device” → “Small Appliances” → “Dehumidifier” in the app, then follow on-screen prompts. Check the Wi-Fi indicator status. If it flashes rapidly, the connection is complete.Indicator Light


Note:
After successful connection, the Wi-Fi indicator will remain solidly lit. You can now control the device via the app.
Long Press the Wi-Fi button for approximately 5s to disconnect the device from the network. The Wi-Fi indicator will turn off.
Ⅳ. Cleaning and maintenance
Clean the air filter(every two weeks)
The air filter requires regular cleaning. Never operate the unit without an air filter, as this may cause cpollution. During operation, dust accumulates on the filter, obstructing airflow and reducing system efficiency. If the filter becomes completely clogged, it may damage the device.
- Disconnect the power supply and unplug the device.
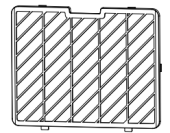
- Remove the filter.
- Immerse the filter in lukewarm water (approximately 40°C). Gently rinse with a neutral detergent.
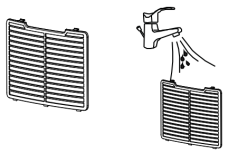
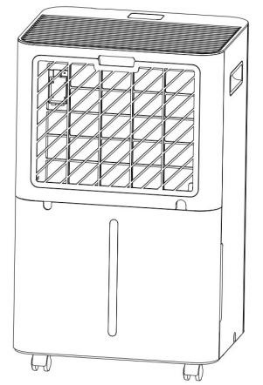
- After thorough drying, reinstall the filter.


Caution: Do not use in damp conditions to prevent odors or fan rusting.
Long-Term Storage
If the device will not be used for an extended period (more than several weeks), it is best to clean and thoroughly dry it. Follow these steps for storage:
- Press the power button to turn off the device and unplug the power cord.
- Drain any remaining water from the device.
- Clean the filter and place it in a cool, shaded area to dry completely.
- Collect the power cord near the water tank.
- Reinstall the filter in its original position.
- The device must remain upright during storage.
- Store the device indoors in a well-ventilated, dry location free from corrosive gases and secure.
Note: To prevent component damage and mold growth, the device must be completely dry before storage. Please unplug the power cord and allow the device to air dry in a dry, ventilated area for several days.
Ⅴ. Cautions
- Before use, ensure the marked voltage matches your local mains supply. Only use the original or manufacturer-specified power cord.
- Do not use if the plug, power cord, or product is damaged. Do not disassemble or modify the product yourself. Contact customer service immediately if any problem occurs.
- Do not plug or unplug the power cord or operate the device with wet hands.
- If smoke, unusual odors, excessive heat, deformation, or other problems occur during operation or charging, immediately disconnect the power and cease use. Contact customer service if necessary.
- This product must be used under supervision. Do not leave the device operating unattended. Never tilt or invert the device.
- This product is not suitable for use by persons with physical, cognitive, or mental impairments, or those lacking knowledge or experience, including children, unless under the direct supervision and guidance of a responsible adult.
- Do not allow children to play with this product.
- Do not use outdoors. This dehumidifier is intended solely for indoor residential use.
- This device must only use R-290 (propane) as the designated refrigerant.
- R-290 (propane) is flammable. Never release refrigerant into the atmosphere.
- The refrigeration circuit is sealed. If a propane gas leak is detected or suspected, do not attempt to investigate the cause yourself. Contact customer service immediately.
- The propane gas used in this device is odorless. No odor does not indicate there is no gas leak. If a leak is detected, immediately evacuate all personnel from the premises, ventilate the area by opening windows, and contact the local fire department to report the propane leak.
- No one is allowed to return until qualified maintenance technicians arrive scene and confirm the premises are safe.
- All device components are designed for propane compatibility and feature non-flammable, non-sparking properties. Never replace parts yourself; contact customer service for any replacement needs.
- Keep the device away from open flames, flammable, or explosive materials. Strictly prohibit the use of open flames, cigarettes, etc.
- Never immerse the device in water or expose it to rain, moisture, or any other liquids.
- Do not place any objects on top of the device.
- Do not climb on or sit on the device.
- Do not insert fingers or other objects into the air outlet.
- Do not touch the device's air inlet or internal components.
- Do not use methods other than those recommended to accelerate defrosting or clean the equipment.
- Avoid physical damage to the ductwork. If the installation space is less than 4 square meters, the area must be well-ventilated; otherwise, ductwork installation is prohibited.
- The device should be placed in a well-ventilated area, ensuring no obstructions block the air intake or exhaust vents. The storage space must be sized the room area requirement specified for device operation.
- Do not operate the device near walls, curtains, or other objects that may obstruct air inlets or outlets. Never install this equipment where it may be affected by: heat sources such as radiators, heaters, stoves, or other heat-generating products; areas prone to oil or water splashes; direct sunlight; mechanical vibration or impact; excessive dust; poor ventilation, such as inside cabinets or bookshelves.
- This device must operate within an ambient temperature range of 5°C to 38°C.
- For optimal energy efficiency, keep doors and windows closed.
- It is normal for the air outlet to feel warm after continuous operation in hot weather.
- Please drain any accumulated water from the tank before moving the device.
- The compressor features 3min protection delay; allow 3min for the dehumidifier to resume operation.
VI. Common Problems
|
Common Problems |
Possible reasons |
Solution |
|
Unable to power on |
The power plug is not inserted or is not fully inserted. |
Re-plug the plug into the socket. |
|
The power outlet is not powered. |
Turn on the socket switch or replace the power socket. |
|
|
The screen's power switch is not turned on. |
Turn on the switch |
|
|
The fan is not working, the motor is faulty. |
Please contact customer service for assistance. |
|
|
Loose motor wiring terminals |
Please contact customer service for assistance. |
|
|
Main control board failure |
Please contact customer service for assistance. |
|
|
Product overheating |
Long continuous running time |
Rest for 60 minutes before using. |
|
Excessive dust buildup in the filter caused dust to adhere to the air inlet. |
Clean dust from the air inlet and filter. |
|
|
Strange noise |
The machine is not placed stably, and the vibration transmits noise. |
Move the air conditioner to a flat, hard surface, or place a shock-absorbing pad under the unit to reduce vibration transmission and avoid resonance noise. |
|
Wind turbine damaged |
Check if the fan blades are damaged. If damaged, the fan needs to be replaced. Please contact customer service for assistance. |
|
|
Weak dehumidification effect |
The indoor space is too large or the insulation is poor. |
1. Confirm the applicable area for the dehumidifier and refer to the product manual |
|
The screen is unclickable |
Triggering child lock protection |
Press and hold for 3 seconds to exit child lock protection. |
|
The screen displays "88". |
The water tank is full. |
Empty the water tank and start it again. |
|
The screen displays "FL" |
Empty the water tank and start it again. |
|
|
Water tank indicator light is red. |
Empty the water tank and start it again. |
|
|
Triggering a beep |
Empty the water tank and start it again. |
|
|
There is still water in the tank after the hose is directly connected. |
Installation error |
Install correctly according to the instruction manual |
|
Water pipe bent or water pipe damaged |
Please contact customer service for assistance. |
|
|
The Wi-Fi light is flashing or the connection is not established. |
Poor network signal |
Simply move closer to the router and follow the instructions to operate it again. |