

KFJH022 ELECTRIC COFFEE MACHINE User Manual
Ⅰ. Product
| Product Name | Model No | Rated Power | Rated Voltage | Rated Frequency |
| 3-in-1 Semi-Automatic Espresso Machine | CM1628 | 1500W | 220-240V | 50/60Hz |
Ⅱ.Product Diagram
1.Parts
This product includes the following parts:
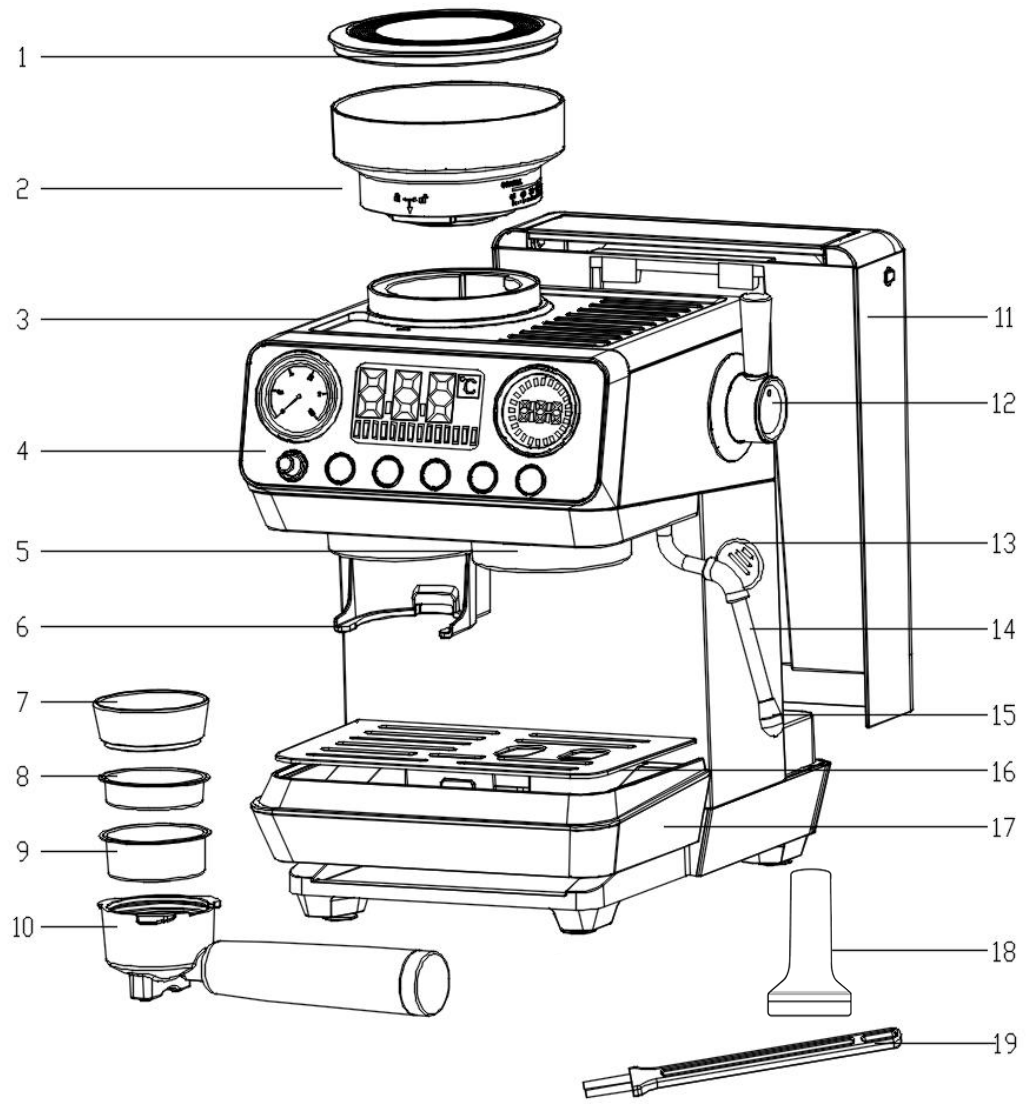
| 1.Bean Hopper Lid | 11.Water Tank |
| 2.Bean Hopper | 12.Steam Knob |
| 3.Cup Warming Tray | 13.Steam Wand Handle |
| 4.Control Panel | 14.Steam Wand |
| 5.Brew Head | 15.Steam Nozzle |
| 6.Portafilter Holder | 16.Cup Tray |
| 7.Dosing Ring | 17.Drip Tray |
| 8.Single Cup Double-Wall Filter | 18.Coffee Tamper |
| 9.Double Cup Double-Wall Filter | 19.Cleaning Brush |
| 10.Portafilter |
2.Control Panel Instructions
The control panel buttons function as follows (refer to the diagram):
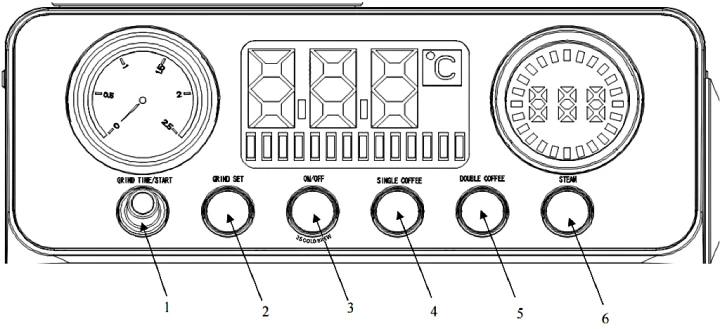
| Button | Function | Button | Function |
| 1.GRIND TIME/START | Press to start/stop grinding; rotate to adjust grind time (press “Grind Setting” first) | 2. GRIND SET(Single/Double Cup) | Press once for single-cup grind (blue light); press twice for double-cup grind (white light) |
| 3. ON/OFF | Short press to turn on Hot Brew mode; long press 3s for Cold Brew mode; short press to turn off | 4.SINGLE COFFEE | Press once to brew one cup; long press 3s to set custom cup volume |
| 5.DOUBLE COFFEE | Press once to brew two cups; long press 3s to set custom cup volume | 6.STEAM | Switch between Steam / Hot Water mode |
Ⅲ. Operating Instructions
Installation Instructions
1.1 Water Tank Installation
Pour water into the water tank. Do not exceed the “max” mark.
1.2 Grinder Assembly Installation
① Insert the dosing ring into the portafilter.
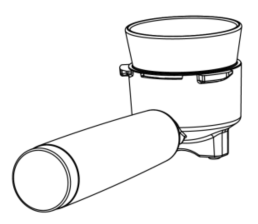
② Mount the portafilter onto the left portafilter holder.
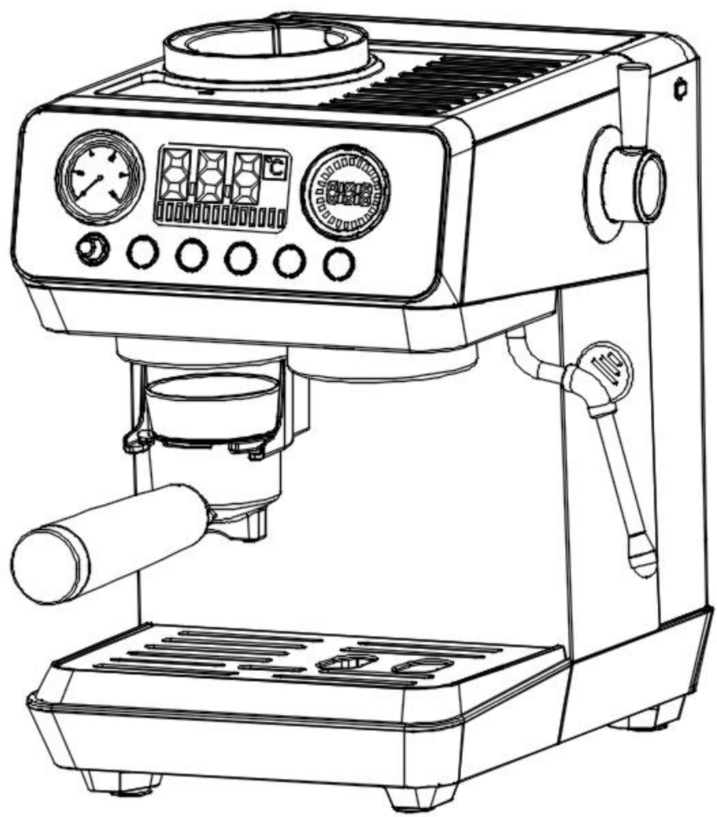
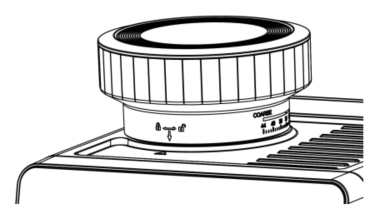
③Align the arrow on the bean hopper with the triangle on the machine and insert the hopper. Rotate clockwise until you hear a “click-click-click” sound, indicating the hopper is secured.
Note: If the bean hopper is not installed properly, the “GRIND TIME/START” button light will not turn on, and the grinder will not operate.
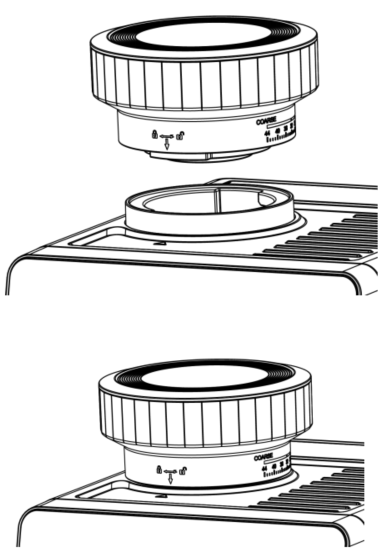 →
→ 
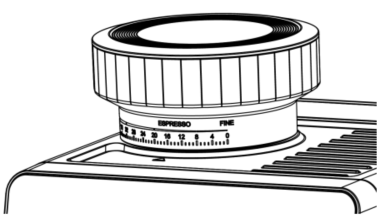
④Once the hopper is installed, continue rotating it clockwise to adjust grind size (0–44 levels). Smaller numbers produce finer coffee; “0” is the finest, “44” the coarsest.
⑤To remove the bean hopper, rotate anti-clockwise to align the arrow with the release mark.
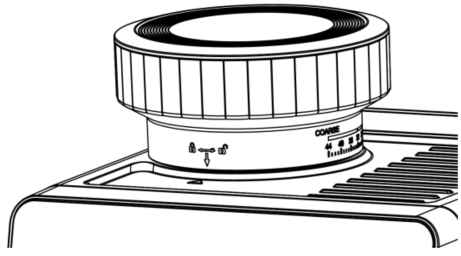
1.3 Portafilter Installation
Insert the portafilter with the single/double cup double-wall filter from bottom to top into the machine, then rotate anti-clockwise until it locks in the center position.
2. Preparation for First Use
Before first use, flush the internal parts and accessories as follows:
①Plug in the machine and press the ON/OFF button. The control panel icons will flash during preheating. When preheating is done, all icons stay on, and the machine is in standby.
②Place a cup under the Steam Wand. Turn the Steam Knob anti-clockwise to start pumping water. After approximately 100 ml is dispensed, turn the knob clockwise to stop.
③Place a cup under the Portafilter Assembly. Press the Double Coffee button. The machine will pump water to the preset amount, then return to standby, completing the internal flushing process.
Note: The internal pump may produce vibrations and noise while dispensing water. This is normal. If the machine has been used before, the above steps are not required.
3. Core Function Instructions
3.1 Grinder Operation
After completing 1.2 Grinder Assembly Installation, add coffee beans to the Bean Hopper and rotate to select the desired grind size. Recommended grind levels:Espresso: 8–12Cold Brew: 13–16Moka Pot: 17–24Pour-over/American: 25–40
Note: Using a grind that is too fine may block water flow. Adjust according to actual conditions.
- Single-Cup Grinding
①Press the GRIND SET button once. The indicator flashes blue. Default grind time: 4 s
Press the GRIND TIME/START button to start grinding. Press this button or GRIND SET again to stop. The machine returns to standby when grinding is complete.
- Double-Cup Grinding
Press the GRIND SET button twice. The indicator flashes white. Default grind time: 8 s
Press the GRIND TIME/START button to start grinding. Press this button or GRIND SET again to stop. The machine returns to standby when grinding is complete.
- Custom Grind Time (Single/Double Cup)
Method 1: Press the GRIND SET button to select Single/Double mode, rotate GRIND TIME/START button to adjust grind time (CCW 1 step = −0.5 s, CW 1 step = +0.5 s). Press GRIND TIME/START button to confirm and start grinding. Future grinds follow this time setting.
Method 2: Press the GRIND SET button to select Single/Double mode. Rotate GRIND TIME/START button to adjust grind time without starting the grinder. After 3 s, a beep sounds and Grind Setting flashes three times, indicating success. Future grinds follow this time setting.
- Manual Grinding
Press GRIND TIME/START. The buzzer beeps once. Grinding starts (default 30 s). Press this button or GRIND SET to stop early. The buzzer beeps again when finished.
Note: If the Portafilter cannot be installed after grinding, check if the filter contains too much coffee grounds. Ensure they do not exceed the MAX line
3.2 Coffee Brewing
After grinding, use the coffee scoop to tamp the grounds, insert the Portafilter, and rotate anti-clockwise to lock in place. Place a cup under the portafilter. Single-cup: ~7 g coffeeDouble-cup: ~14 g coffeeAdjust according to taste.
- Single-Cup Coffee
①Press SINGLE COFFEE button. Indicator flashes and coffee begins to flow. Adjust cup to allow liquid to flow along the inner wall.
②Machine stops automatically when preset volume is reached. Press button to stop early.
③Long press 3 s to save custom volume. The button indicator will flash and the machine will beep three times, then start brewing. When the cup reaches the desired volume, press the SINGLE COFFEE button again. The machine will beep three times, and this duration will be memorized. Future single-cup brews will follow this recorded time (Setting range: 10–60 seconds; if less than 10 seconds, 10 seconds will be recorded).
- Double-Cup Coffee
Press the DOUBLE COFFEE button once, the button indicator will flash, and coffee will start flowing while adjusting the cup position so that the coffee flows along the cup wall into the cup.
②Machine stops automatically at preset volume. Press button to stop early.
Press and hold the DOUBLE COFFEE button for 3 seconds to customize the coffee volume, using the same procedure as for a single cup (maximum 60 seconds, minimum 10 seconds).
- Cold Brew Coffee
①When the machine is off, press and hold the ON/OFF button for 3 seconds to enter Cold Brew mode, and the SINGLE COFFEE and DOUBLE COFFEE buttons will stay lit.
②Press the SINGLE COFFEE button to dispense a single serving of cold brew coffee; press the DOUBLE COFFEE button to dispense a double serving of cold brew coffee.
③If switching from hot brew to cold brew, first press the ON/OFF button to turn off the machine, then long-press the button for 3 seconds to enter cold brew mode. At this time, the lights on the SINGLE COFFEE and DOUBLE COFFEE buttons will flash to indicate the temperature is too high; press the SINGLE COFFEE or DOUBLE COFFEE button, and the machine will pump cold water to lower the temperature. When the temperature drops below 45°C, water output will stop and the machine will beep three times, indicating that the cold brew function can be used normally.
Note: For colder cold brew coffee, you can add a certain amount of ice cubes or ice water to the water tank.
- Coffee Temperature Setting
After preheating is complete, press and hold the STEAM button for 5 seconds to enter the temperature selection mode (the lights on the SINGLE COFFEE, DOUBLE COFFEE and STEAM buttons will flash in sequence):
SINGLE COFFEE button: Low temperature mode, screen displays 90℃;
DOUBLE COFFEE button: Medium temperature mode, screen displays 93℃;
STEAM button: High temperature mode, screen displays 96℃.
After pressing the button, the button light will flash quickly three times, indicating the setting is successful and the machine returns to the coffee brewing state.
3.3 Hot Water Function
① Press the ON/OFF button to start preheating. When preheating is complete, the button light will stay steadily on.
②Place a cup under the Steam Wand. Turn the Steam Knob anti-clockwise to the “ ” position to start dispensing hot water. (Note: No need to press the STEAM button.)
③ After reaching the desired amount of hot water, turn the Steam Knob clockwise to close it. (Note: The hot water can be used for drinking, cleaning, or warming cups.)
3.4 Steam Frothing Function
① When the machine has finished preheating (steam indicator light is steady), place an empty cup under the Steam Wand and press the STEAM button; the button indicator light will change from steady to flashing.
② Rotate the Steam Knob anti-clockwise for about 3 seconds to release hot water in the pipeline, then rotate it clockwise to close the knob.
③ Pour 1/3 of cold whole milk into the frothing cup, insert the Steam Nozzle about 1 cm into the milk surface, and slowly turn the Steam Knob anti-clockwise until steam is released. When the milk reaches approximately 65℃ and the foam begins to expand, turn the Steam Knob clockwise to stop the steam, remove the frothing cup, and press the STEAM button to turn off the steam function.
④ After frothing the milk, hold the Steam Wand Handle and rotate the Steam Wand above the Drip Tray. Wipe off any milk residue on the Steam Wand and Steam Nozzle with a damp cloth, then use the “Hot Water Function” to flush the inside of the Steam Wand to prevent milk from drying and clogging the Steam Nozzle.
Caution: The “steam wand” and “steam nozzle” are hot—handle with care!
⑤Gently tap and swirl the milk frothing cup on the countertop to integrate the foam, then pour it into the coffee cup. (Optionally, sprinkle cocoa powder or chocolate syrup according to personal preference.)
4.Advanced Function Instructions
4.1 Descaling Function
- Descaling Reminder
After approximately 400 cups of coffee, the “Power” light will continuously flash each time the machine is turned on reminding you to descale. Once descaling is completed, the “Power” light will return to steady on. If descaling is not performed, the flashing of the “Power” light will stop after the machine is turned off 10 times.
Note: When the “Power” light flashes to remind you to descale, the machine can still be used. However, descaling should be done as soon as possible to avoid clogging of the internal pipes.
- Starting the Descaling Process
①Add the descaling agent (about 12g) to the water tank, fill with water up to the “max” mark, and stir to fully dissolve the descaling agent. Place a large empty cup under the steam outlet and the brew head.
②Short-press the ON/OFF button. After preheating, long-press the DOUBLE COFFEE and STEAM buttons simultaneously for 3 seconds to start the descaling function (at this time, only the ON/OFF light flashes, and all other lights are off).
Note: After the descaling function is activated, other buttons will not work, and it can only be canceled by pressing the power button or cutting off the power.
③ Open the Steam Knob to allow the descaling solution to flow out from the steam outlet. Occasionally close the knob during the process to let a small amount of descaling solution flow out from the coffee outlet. Refill the water tank with clean water if the water level is insufficient.
④ After about 7 minutes, the water pump will stop, and the machine will sound three beeps to indicate the descaling process is complete. The ON/OFF light will return to steady on.
⑤ After descaling, discard the descaling solution from the water tank, add clean water, and manually run the extraction and hot water functions (without coffee grounds) 2–3 times to rinse the machine thoroughly, ensuring both the coffee and milk froth outlets are cleaned.
4.2 Factory Reset
- Coffee Function Reset: While the machine is powered on, press and hold the SINGLE COFFEE and DOUBLE COFFEE buttons simultaneously for 3 seconds. The buzzer will sound three times, and the SINGLE COFFEE, DOUBLE COFFEE and STEAM button lights will flash five times, indicating the coffee functions have been reset to factory settings.
- Grinder Function Reset: While the machine is powered on, press and hold the GRINDER SET button for 3 seconds. The buzzer will sound three times and the GRINDER SET light will flash five times, indicating the grinder functions have been reset to factory settings.
4.3 Auto Power-Off
If there is no operation for 15 minutes, the machine will automatically power off and all indicator lights will turn off.
Ⅳ.Cleaning and Maintenance
1.Before cleaning, unplug the machine and wait until it has completely cooled down.
2.Wipe the exterior and components of the machine with a damp cloth or cleaning sponge. Do not immerse the machine in water, avoid using alcohol or solvent-based cleaners.
3.Unscrew the coffee funnel, remove the coffee grounds from the filter, and rinse thoroughly with water. Wipe the funnel assembly with a dry cloth to prevent oxidation.
Note: The funnel assembly must not be cleaned in a dishwasher, it will oxidize.
4.Clean the conical burrs regularly; this not only maintains hygiene but also extends the lifespan of the burrs.
5.To preserve the coffee aroma and prevent deterioration, empty the coffee container after use.
6.Never rinse the grinding parts with water, and do not use strong detergents or abrasive pads for cleaning.
7.To remove the upper burr: Place an empty bean container and run the grinder function to clear residual beans from the burr. Remove the bean container, hold the upper burr handle, rotate anti-clockwise, lift it vertically, and clean the upper burr with a brush.
8.Use a cleaning brush to remove coffee residues from the lower burr and grinding chamber, then run the machine empty to expel leftover grounds.
9.After cleaning, place the upper burr back into the lower chamber, rotate the handle clockwise until a "click" is heard. The handle should be horizontal or at a 90° angle to the machine, indicating proper installation. Lower the handle to complete installation.
Note: Ensure all residual grounds in the lower burr are removed before reassembly.
For long-term storage, keep the product in a dry, cool place. Avoid areas with excessive dust, high temperatures, and direct sunlight.
Ⅴ.Warning
1.Read this manual carefully before using the product and keep it for future reference.
2.This product is not intended for use by persons with physical, cognitive, or mental impairments, or those lacking knowledge and experience, unless supervised.
3.Keep it out of reach of children.
4.Before use, ensure the marked voltage of the product matches the local supply voltage. Only use the original or manufacturer-specified power cord and charger.
5.Do not use the product if the plug, power cord, or the product itself is damaged, cracked, or leaking electricity. Do not disassemble or modify the product yourself. Contact customer service immediately if any abnormality occurs.
6.Do not plug in/unplug the power cord or operate the appliance with wet hands.
7.If the appliance emits smoke, unusual odor, overheats, or deforms during operation, turn off the power immediately and stop using it. Contact customer service if necessary.
8.This product is intended for household use only and must not be used for commercial or professional purposes; the machine is designed solely for brewing coffee and grinding coffee beans and should not be used for any other purpose.
9.Always supervise the appliance when in use. Do not leave it running unattended. Disconnect the power supply before leaving, cleaning or servicing the product.
10.When operating the coffee machine, do not touch hot components with your hands to avoid burns.
11.This product must be connected to a grounded power outlet. Ensure the plug is fully inserted.
12.Place the coffee machine on a flat surface. Do not let the power cord hang over the edge of a table or counter, and ensure the cord does not contact hot surfaces.
13.Do not use the machine in high-temperature, high-magnetic, or humid environments. Do not place it on hot surfaces, near open flames, or on other appliances (e.g., the top of a refrigerator).
14.Do not operate the machine without water. Before first use, boil water twice to remove any odor.
15.Do not move or turn off the power while the coffee machine is operating.
16.Clean and maintain the coffee machine components regularly to ensure coffee quality and prolong the machine’s service life.
Ⅵ.Common Issues
If you encounter the following issues, please refer to the table below for troubleshooting:
| Symptoms | Cause Analysis | Solution |
| No water comes out | Water tank is empty | Add water to the tank, not exceeding the max line |
| Water tank not installed properly or rubber stopper not removed | Reinstall the water tank correctly; remove the water tank rubber stopper | |
| Machine left empty for too long | Use the hot water function multiple times to flush internal pipes | |
| No steam | Steam outlet blocked | Use a small wire to clear the steam outlet hole |
| Not in steam mode or preheating not completed | Press the STEAM button and wait until the steam indicator stays on to complete preheating before use | |
| Little coffee crema | Coffee grounds too coarse | Adjust to a finer grind setting, replace with finer coffee grounds |
| Too little coffee grounds | Add an appropriate amount of coffee grounds | |
| Coffee grounds not tamped | Use the bottom of the coffee scoop to tamp the grounds properly | |
| Milk foam not forming properly | Not using whole milk | Replace with chilled whole milk (about 5°C) |
| Steam nozzle inserted too deep into milk | Adjust the nozzle to 1 cm above the milk surface | |
| Slow coffee flow / small volume | Coffee grounds too fine | Adjust to a coarser grind setting, replace with suitable coffee grounds |
| Too much coffee grounds | Reduce the amount of coffee grounds; 7 g for single cup, 14 g for double cup | |
| Coffee temperature too low | Using low-temperature brew mode | Long press the steam button for 5 seconds to switch to medium/high temperature mode |
| Brewing immediately after cold machine preheating | After preheating, run 1–2 times double cups of water (without coffee grounds) to fully heat the machine, filter, and funnel | |
| Funnel overflows coffee | Coffee grounds remaining around filter opening | Clean coffee grounds around the filter opening |
| Coffee residue on brewing head seal ring | Clean the coffee residue inside the brewing head with a small brush | |
| Grind button not lit | Bean container not installed properly | Align the container scale with the triangle on the top cover, rotate clockwise to lock |
| Grind too coarse / too fine | Incorrect grind setting | Turn the bean container to adjust; 0 = finest, 44 = coarsest |
| Cannot install funnel assembly | Too much coffee ground in filter | Reduce coffee ground in filter; tamp properly, not exceeding MAX line |
| Unable to power on | Power cord not fully inserted or socket has no power | Check power cord and socket, try another socket, ensure power supply is normal |
| Mainboard malfunction | Contact customer service | |
| Coffee has grounds | Filter damaged, coffee bowl not cleaned, coffee too fine, brewing head seal leaking | Check filter, replace if damaged; clean coffee bowl and brewing head thoroughly after each extraction, remove leftover grounds |
| Grinder produces no coffee | Internal residual grounds clumped | Use a small brush to clean coffee powder from the grinder |
| Accessories installed but no grinding: machine malfunction | Contact customer service |