

SIMPLUS AIR COOLER LFSH006 USER MANUAL
Ⅰ.SPECIFICATIONS
|
PRODUCT NAME |
MODEL NO |
RATED POWER |
RATED VOLTAGE |
RATED FREQUENCY |
|
AIR COOLER |
CF-02R |
100W |
220—240V~ |
50/60Hz |
Ⅱ.IMAGES
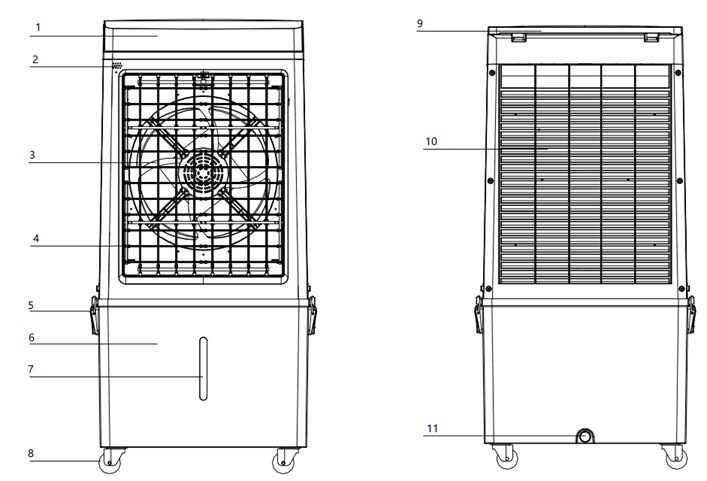
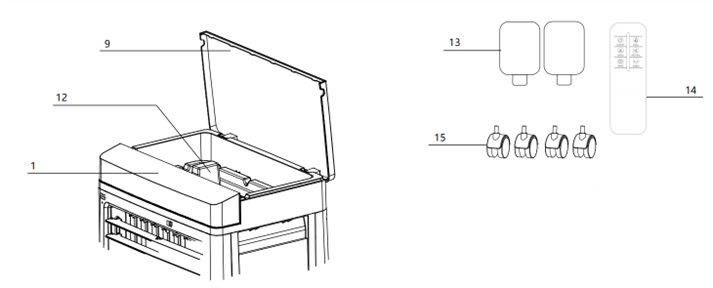
- Control Panel
- Remote Sensor
- Fan
- Air Blades
- Tank Clip
- Water Tank
- Water Window
- Wheels
- Top Cover
- Cooling Pad
- Drain Plug
- Water Tray
ACCESSORIES:
- Ice Pack x2
- Remote Control
- Wheel x4
Ⅲ.INSTRUCTIONS
Installation
1. Place the unit on a stable, flat surface with 50 cm clearance around for ventillation.
2. Take all parts out of the box, remove the foam and lift out the top water tank.
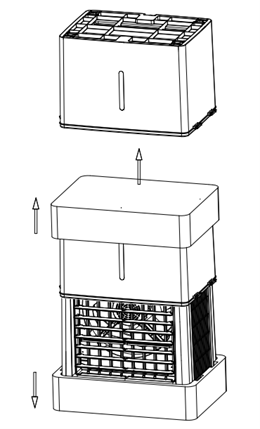
3. Take the wheels from the water tray and attach to the bottom of the tank.
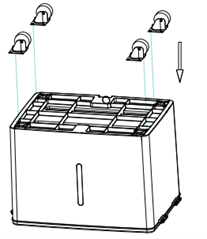
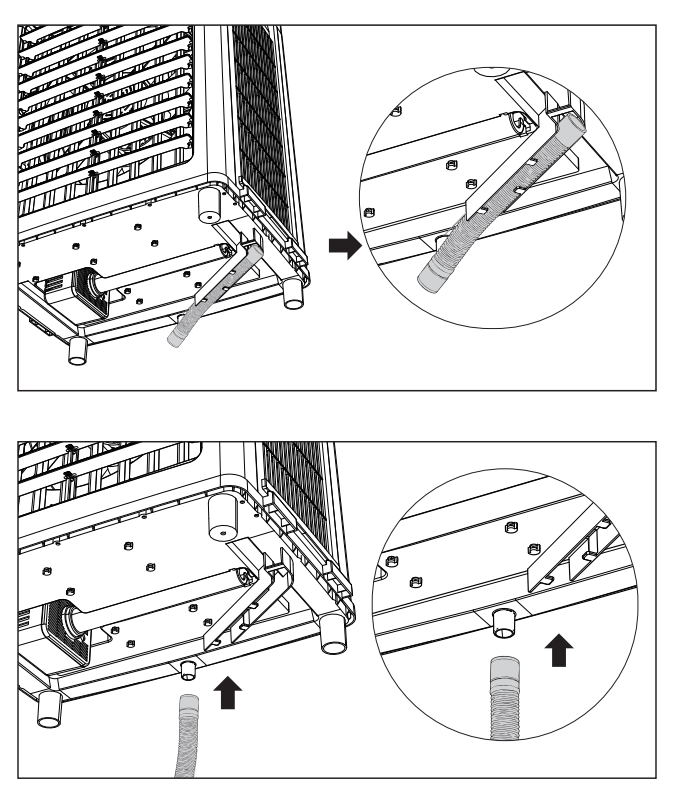
4. Remove the bottom hose and install it as shown.
5. Place the main unit on top of the water tank.
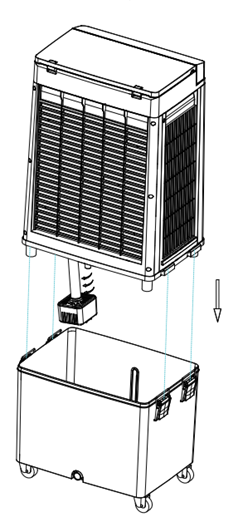
6. Secure the tank to the unit with the water tank clips.
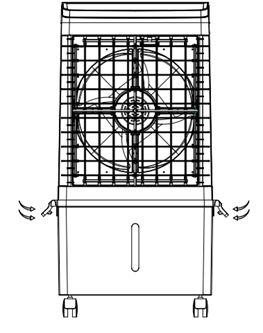
FILLING THE WATER TANK
After assembly, fill the water tank through the water tray on the top cover
- Open the top cover
- Pour clean water into the water tray — it will flow into the tank. Check the water level window; do not exceed max.
NOTE:
- Unplug before adding water,avoid spills on motor or control board,to prevent electric shock.
- To ensure longer lifespan of the unit, use clean or distilled water.
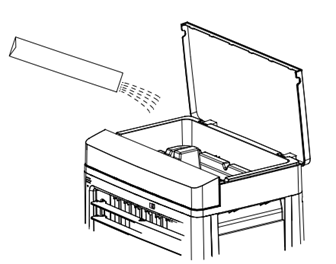
ICE PACK GUIDE
Ice packs keep the airflow cooler.
- Fill the ice packs with water.
- Freeze it for at least 3 hours.
- Place the frozen ice packs into the water tank; select "COOL" mode — the airflow will feel cooler.
NOTE:
- Ice packs can be reused or skipped depending on the surrounding temperature.
- Do not open the ice pack to avoid damage and leaks.
- Ice packs are not edible,keep away from children.
- Made of eco-friendly and non-toxic materials; suitable for freezer use.
- Ice packs can be replaced with ice cubes for the same cooling effect.
DISPLAY & CONTROLS
Plug in the power cord. When the unit beeps and display lights up, it's ready to use.
DISPLAY:

CONTROLS:

 ON/OFF:Press to turn the unit on, press again to turn it off.
 SPEED:Press to select "F1", "F2" and "F3" for low, medium or high fan speed.
 NATURAL:Press to turn on natural wind mode,fan speed will vary automatically.
 SWING:Press to turn the oscillation function on/off.
 COOL:Press to turn cooling on/off. Water pump will draw water from the tank and pass through the cooling pad to cool the air. Ensure the water tank has water when using "COOL".
 TIMER:Press to set timer when unit is on; each press adds 1 hour, up to 12 hours. When timer ends, unit will turn off automatically. Long press to cancel timer.
NOTE:
Adjust fan blades manually to control direction of air flow.
REMOTE CONTROL
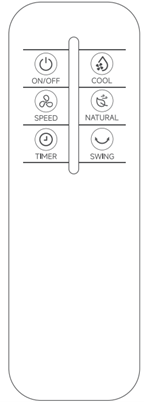
Remote has the same functions as the manual control panel.
NOTE:
- Obstructions between the remote and the unit may affect sensitivity.
- Effectice control distance is about 5 m.
- Avoid dropping or hitting the remote to prevent damages.
- Remove the battery if unused for long.
Ⅳ.CLEANING & MAINTENANCE
- Turn off the unit,start cleaning after 2 min.
- Wipe the exterior using a damp cloth; Do not immerse the unit in water or rinse under a tap, and avoid using harsh cleaners.
- Do not pour hot water or chemicals into the tank; this may damage the unit.
- Drain the water tank and let all parts dry completely before storing.
- Store in a dry, cool place away from dust, heat and direct sunlight.
WATER TANK CLEANING
- Empty the residual water from the tank regularly.
- Remove the drain plug at the bottom of the tank(as shown, below the water tank), tilt the unit and drain completely.
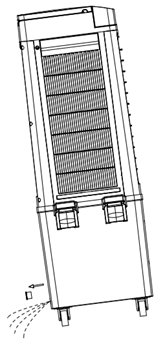
COOLING PAD CLEANING:
Clean the cooling pad every 2 months to prevent blockage from dust or dirt.
- Unscrew the air inlet grille and remove it.
- Take out the cooling pad.
- Cooling pad :Clean using warm water(about 40 ℃)and a mild detergent. Rinse thoroughly with clean water and let it dry.
- Air inlet grille : Clean using a soft brush and water, then carefully reinstall it.
NOTE:
- Do not dry the cooling pad using heat or direct sunlight.
- Ensure cooling pad is completely dry before reinstalling.
Ⅴ.PRECAUTIONS
This product meets all applicable safety standards and regulations. Read this manual carefully before use and keep it for future reference.
- Not suitable for people with physical or mental impairments and children, unless supervised.
- Do not let children play with the unit.
- Ensure the rated voltage matches local supply. Use only the original or manufacturer-specified power cord/charger.
- Do not use if the plug, cord, or unit is damaged. Do not disassemble. Contact customer service if needed.
- Do not touch the plug or operate with wet hands.
- If smoke, unusual smell, overheating, or deformation occurs, disconnect power immediately. Contact customer service if needed.
- For household use only. Do not use commercially, professionally, or other functions not described in this manual. Misuse voids warranty and manufacturer liability.
- Do not leave the unit running unattended. Disconnect power when leaving, assembling, cleaning, or repairing.
- Do not use near bathrooms or swimming pools.
- Unplug before adding water , avoid splashing the motor or control panel. Use clean or distilled water to maintain performance.
- Do not move the unit when the water tank is full.
- Do not exceed the maximum water level.
- Do not use in humid, dusty and extremely hot environments.
- Keep away from curtains or fabrics that could be drawn into the air inlet.
- Do not insert fingers or sharp objects into the vents.
- Keep at least 50 cm clearance around the unit.
- In "COOL" mode, ensure the water tank is filled.
Ⅵ.TROUBLESHOOTING
|
PROBLEM |
POSSIBLE CAUSE |
SOLUTION |
|
|
Unable to turn on |
Plug not inserted properly |
Reinsert the plug fully into the outlet. |
|
|
Outlet has no power |
Turn on the outlet or try a different outlet. |
|
|
|
Display switch is off |
Turn on the switch and press it again. |
|
|
|
Display shows “--” |
Press the ON/OFF key again. |
|
|
|
Timer is on |
Restart the unit. |
|
|
|
Fan not working |
Contact customer service. |
|
|
|
Control panel failure |
Contact customer service. |
|
|
|
Overheating |
Long runtime |
Let it rest for 60 min before use. |
|
|
Dust accumulation on grille |
Clean the front and rear grilles. |
|
|
|
Unusual noise |
Appliance not on a flat surface |
Place on a flat/stable surface or use an anti-vibration pad. To reduce noise due to vibration. |
|
|
Damaged fan blades |
Check blades and contact customer service if damaged. |
|
|
|
Weak airflow |
Fan speed not set |
Press the "FAN" key to change speed. |
|
|
Dust accumulation on grille |
Clean the front and rear grilles. |
|
|
|
Air inlet blocked by nearby objects |
Move the appliance to an open area. |
|
|
|
Black Screen |
In sleep mode |
Press any button to turn the display on. |
|
|
Damaged screen |
Contact customer service. |
|
|
|
Water Leakage |
Overfilled |
Fill only up to the "MAX" line. |
|
|
Water tank not placed correctly |
Ensure the water tank is properly in place. |
|
|
|
Too much water added at once, cooling pads leak |
Add water slowly and evenly |
|
|
|
Remote not working |
Not aimed at infrared sensor |
Point the remote at the sensor of the appliance. |
|
|
Objects blocking |
Remove any obstructions around the sensor. |
|
|
|
Damaged by external force |
Check if the remote was dropped. |
|
|
|
Not cooling |
Ice pack not filled |
1. Fill ice pack with water. |
|
|
Ice pack not frozen |
|
||
|
“COOL”mode not on |
|