

SIMPLUS Vacuum Cleaner XCQH022 User Manual
- Product Specifications
| Product Name | Model No. | Rated Voltage | Rated Power |
| Vacuum Cleaner | P1 | 18.5V | 165W |
- Product Diagram
![]() Battery Pack Release Button
Battery Pack Release Button- Handle
- Air Outlet
- Power Button
- Charging Port
- Battery Pack
- Battery Level Indicator
- Main Unit
- Dust Cup Release Button
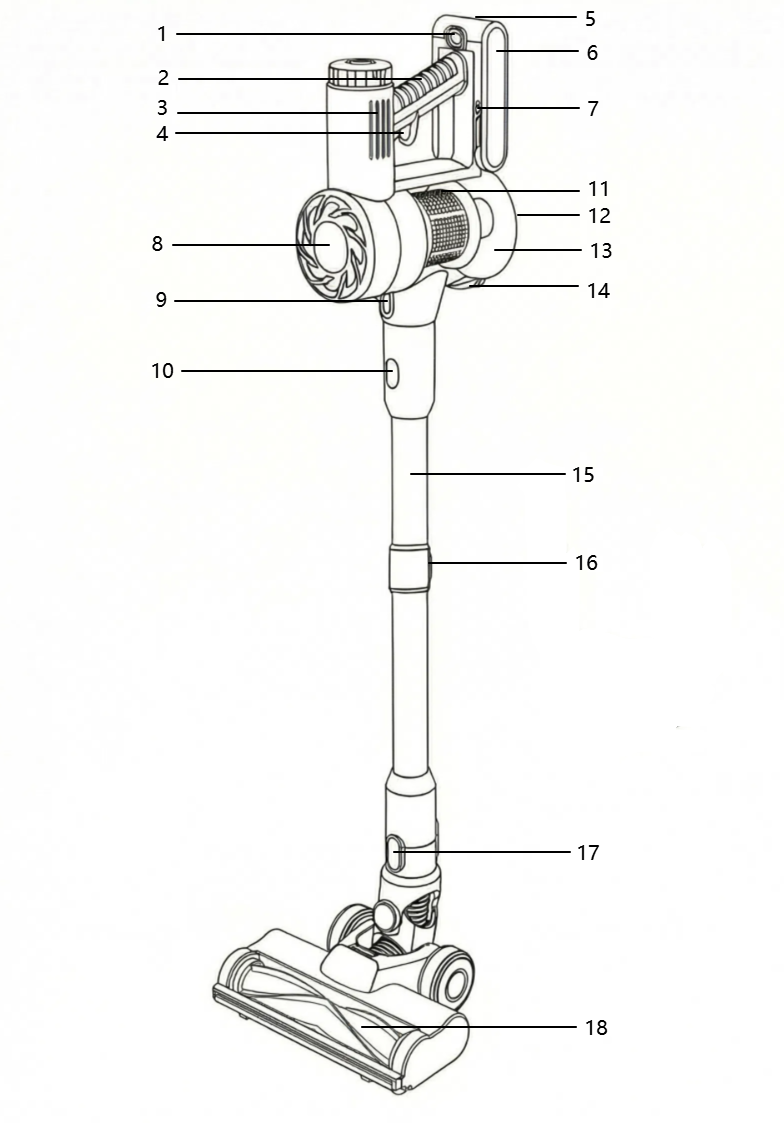 Battery Pack Release Button
- Main Unit Release Button
- Metal Filter
- Dust Cup Lid
- Dust Cup
- Dust Cup Lid Release Button
- Extension Tube
- Extension Tube Adjustment Button
- Floor Brush Release Button
- Floor Brush
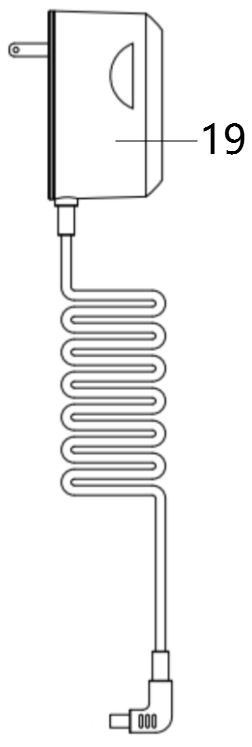
- Adapter
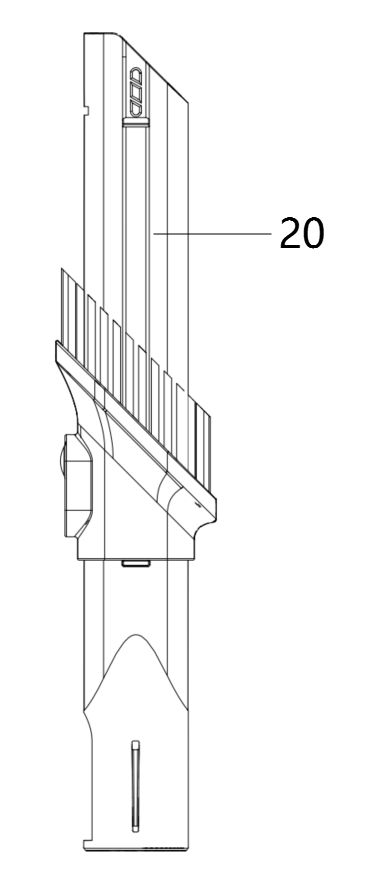
- 2-in-1 Brush Head
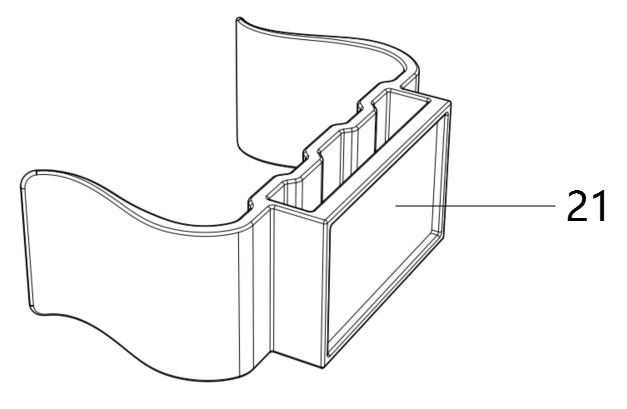
- Wall-Mounted Storage Bracket
- Operating Instructions
- Installation
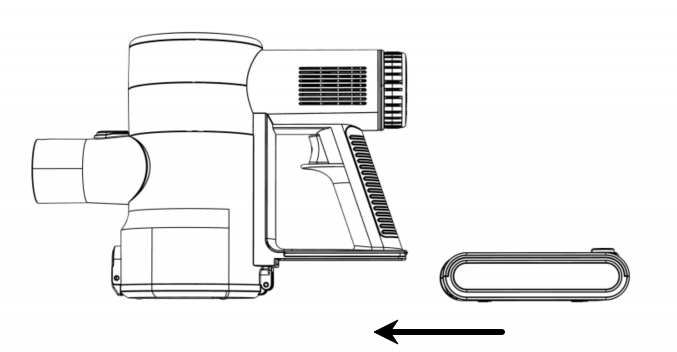
- Battery Pack Installation: Align the battery pack with the main unit and insert it until you hear a click, indicating it is securely installed.
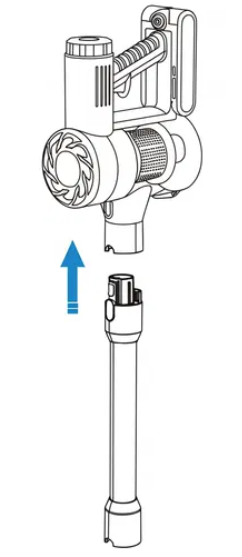
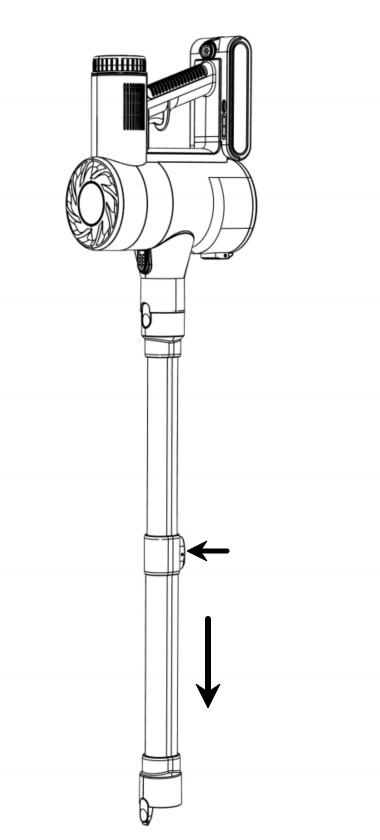
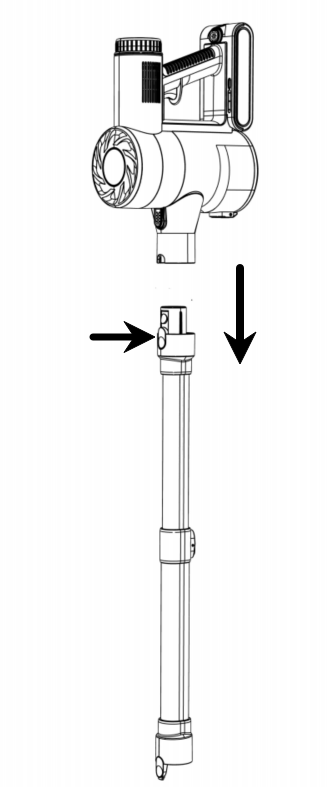
- Extension Tube Installation: Align the main unit with the extension tube and insert it until you hear a click. Press the extension tube adjustment button shown in the diagram to adjust the tube to the desired length.
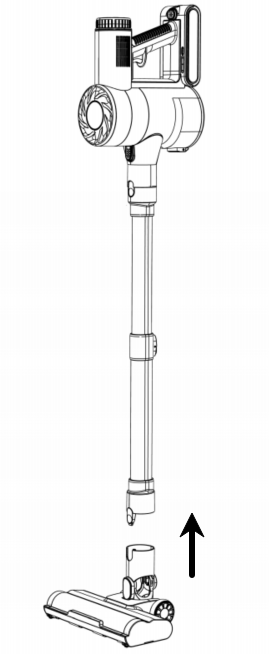
- Floor Brush Installation: Align the extension tube with the floor brush and insert it until you hear a click.
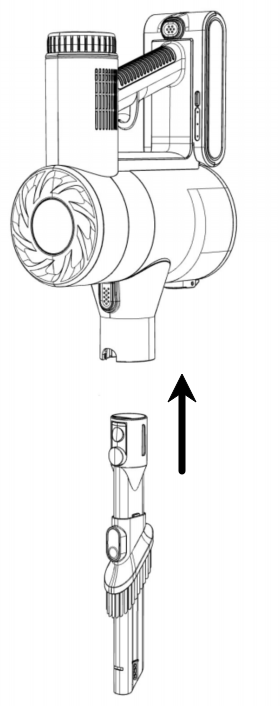
- 2-in-1 Brush Head Installation: Align the main unit with the 2-in-1 brush head and insert until you hear a click.
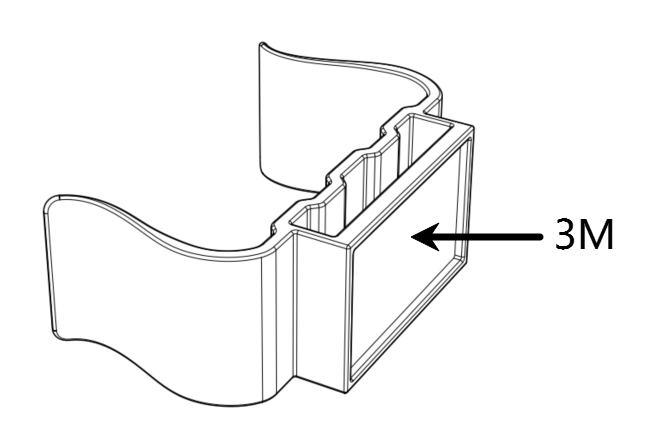
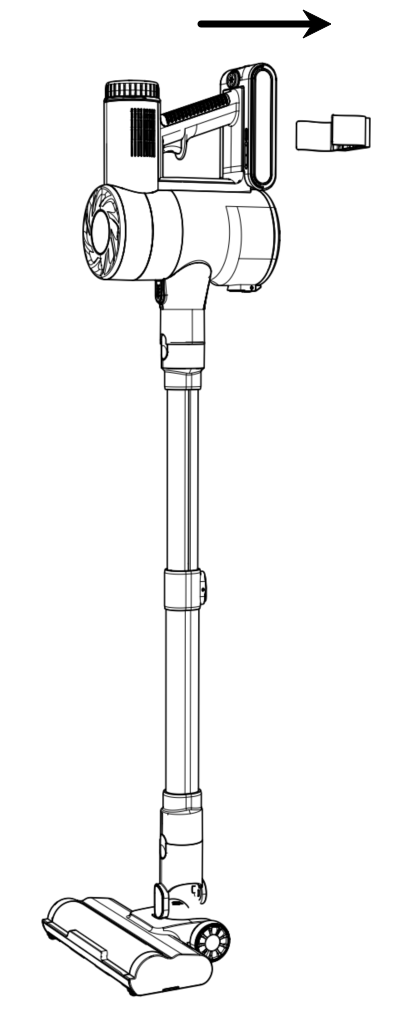
- Wall Mount Storage Bracket Installation: First, determine the installation height for the bracket. Then, apply the included 3M adhesive tape to the back of the bracket and press it firmly onto a smooth surface. Once installed, slot the vacuum cleaner's battery pack area into the bracket to hold it in place.
- Disassembly Instructions
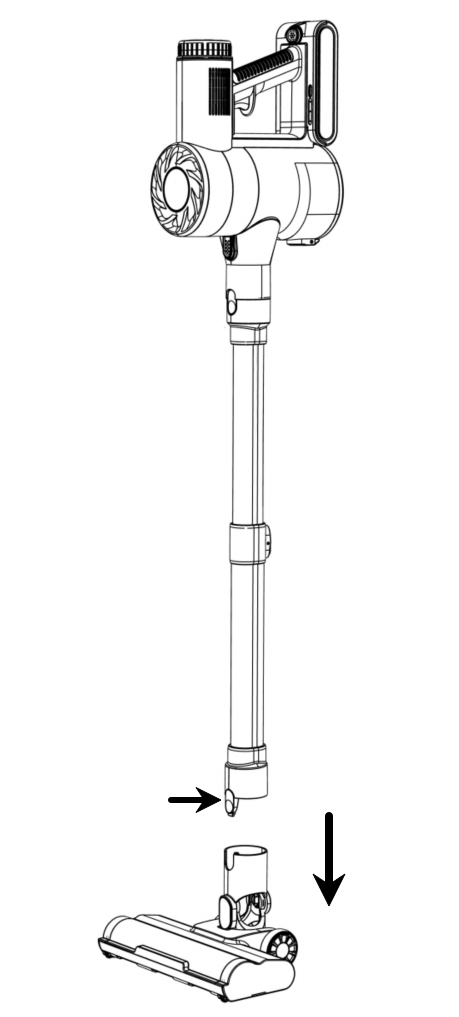
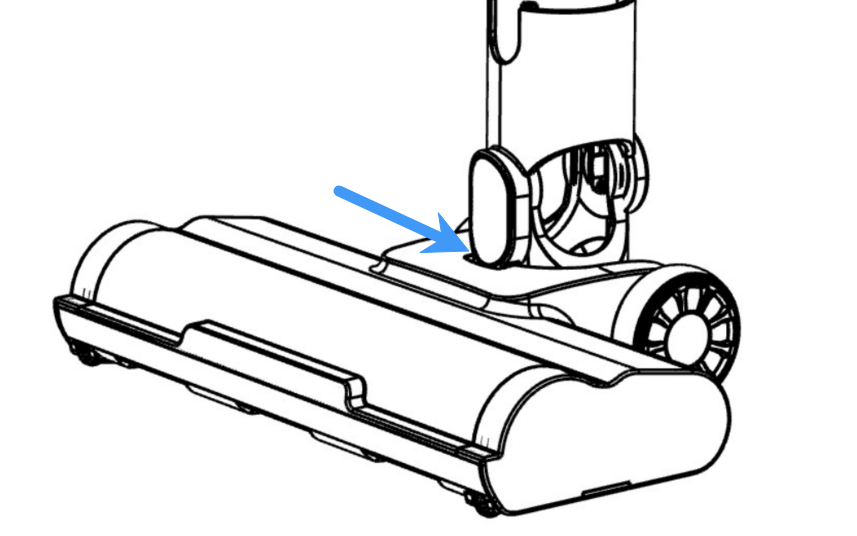
- Floor Brush Disassembly: Press the floor brush release button, hold the main unit handle, and pull upward to detach the floor brush.
![]()
- Extension Tube Disassembly: Press the main unit release button, hold the main unit handle, and pull upward to detach the extension tube.
- Charging Instructions
- Three Charging Methods Available
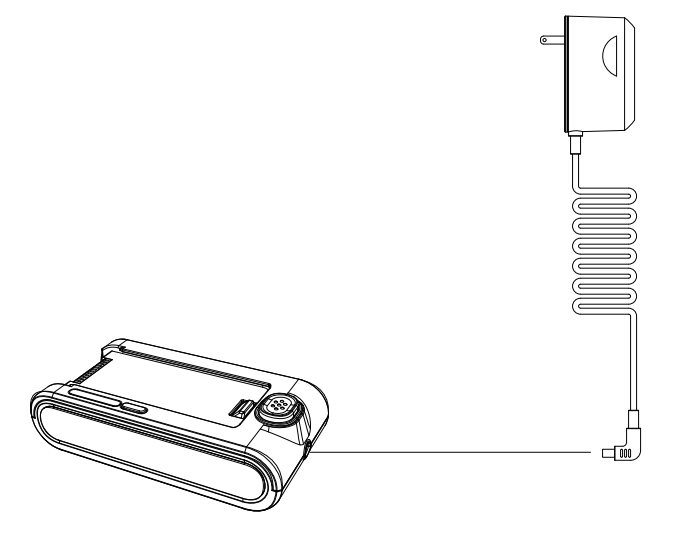
Method 1: Press the battery pack release button to remove the battery, then connect the charger to charge it.
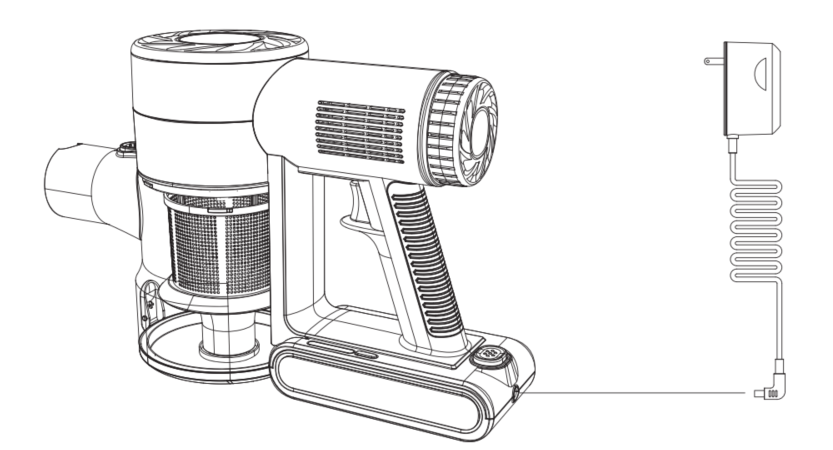
Method 2: Press the main unit release button, place the main unit on a flat surface, and connect the charger to charge it.
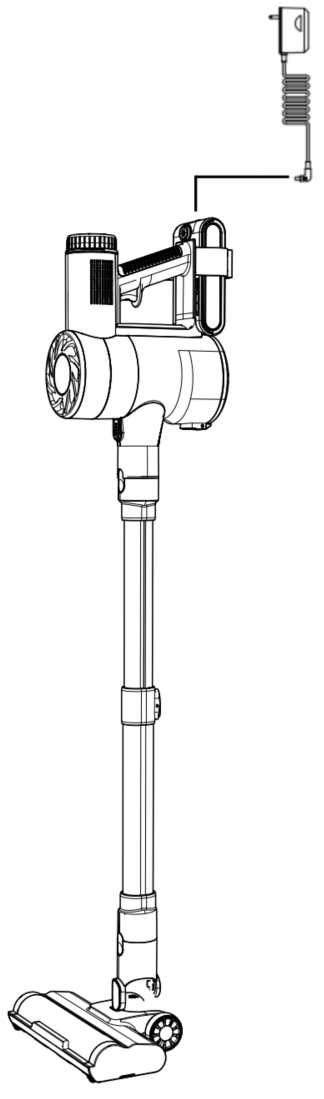
Method 3: Lean the vacuum cleaner against a wall and connect the charger directly to charge it.
- Battery Indicator Light Description:
| Indicator Light Status | Meaning | Action |
| Three lights stay on for 2 minutes then off | Battery fully charged | — |
| Three lights flash in sequence | Charging in progress | — |
| Three lights flash twice within 1 second | Charging Error | Check if original 22.2V 0.5A adapter is used |
| Three lights flash once within 1 second | High Temperature | Pause charging or turn off, wait to cool before recharging |
| Three lights flash once within 1 second, 5 times | Over-Temperature Protection | Pause charging or turn off, wait to cool before recharging |
| Three lights flash twice within 1 second, 10 times | Over-Current Protection | Check the adapter, or plug and unplug the battery several times |
| One light flashes once every 2 seconds, 5 times | Under-Voltage Protection | Charge promptly |
| One light flashes twice every 1 second continuously | Brush roll jammed/stalled | Clean the brush roll promptly |
Note: The battery pack has an overcharge protection. Leaving the adapter plugged in after fully charged will not damage the battery. For first-time use or after long-term storage, perform 2-3 full charge/discharge cycles to activate the battery.
- Brush Head Accessory Description
- 2-in-1 Brush Head - Crevice Tool Mode: Press the button on top of the brush and slide the brush backward until it stops. The head is now in crevice tool mode, suitable for cleaning narrow gaps like window sills, bed frames, and furniture crevices.
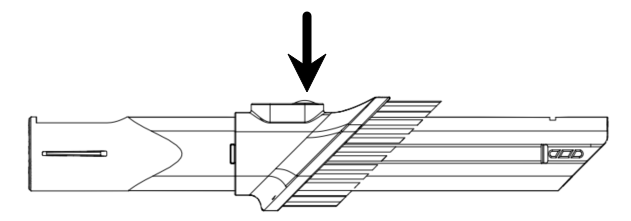
- 2-in-1 Brush Head - Brush Mode: Press the button on top of the brush, slide the brush forward until you hear a click. The head is now in brush mode, suitable for cleaning dust and hair from carpets, bedding, curtains, etc.

- Usage Instructions
- Fully charge the device before first use.
- Power On/Off & Speed Adjustment: Ensure the battery pack is properly installed. Press the power button to turn on. The default setting is low speed. Press the button again to switch to high speed. Press the button once more to turn off.
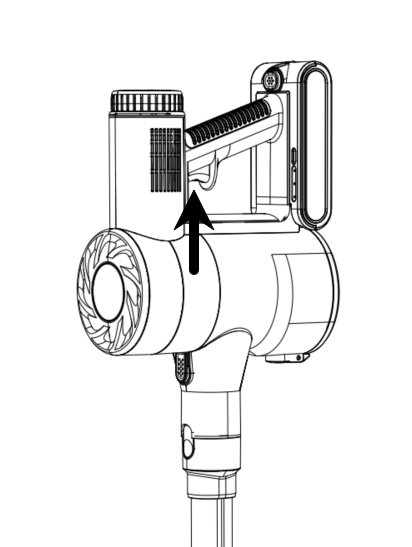
Note: The main unit has a soft-start protection feature. The interval between button presses should be greater than 1 second. Rapid, frequent pressing may prevent the unit from starting.
- Extension Tube Length Adjustment: To adjust the height, press the extension tube adjustment button, pull the tube up or down to the desired height. Release the button to lock it in place.

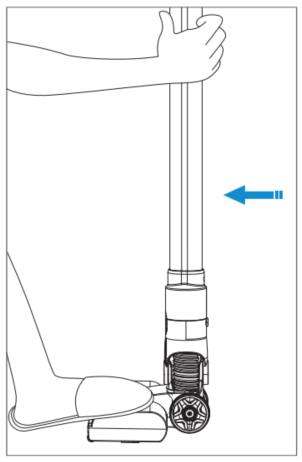
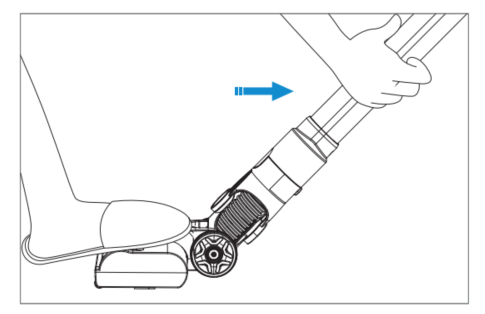
- Self-Standing Feature: Step on the floor brush and push the extension tube forward until the swivel joint clicks into the groove to enable self-standing function. Pull the extension tube backward to exit self-standing mode.
- Battery Level Display: The battery pack has three LED indicator lights that automatically show the current battery level when the device is on. Three lights on = high battery level; two lights on = medium battery level; one light on = low battery level, recharge soon; one light flashing = battery nearly depleted, the device will automatically reduce speed or shut down, please recharge immediately.

- The floor brush has a green LED light that stays on during operation, helping illuminate dust and debris on the floor.
- Cleaning and Maintenance
- To maintain optimal performance, empty the dust cup promptly when full. It is recommended to clean the inlet HEPA filter and outlet sponge every 2-3 weeks. It is recommended to replace the HEPA filter and sponge set every 2-3 months.
- Turn off the machine and let it cool before cleaning.
- Empty the dust cup promptly when full. Use the cleaning brush to remove tangled hair.
- Wipe the exterior with a soft, dry cloth. Do not use hard or sharp objects to avoid scratching the surface.
- Do not immerse the entire device in water or rinse it under a faucet.
- Do not clean using steel wool, abrasive cleaners, or corrosive liquids.
- Allow all parts to dry completely before storage.
- Store the product in a dry, cool place away from dust, high temperatures, and direct sunlight.
- Do not dry the device under direct sunlight after cleaning.
- Press the battery pack release button to remove the battery pack before cleaning.

- Dust Cup and Filter Cleaning
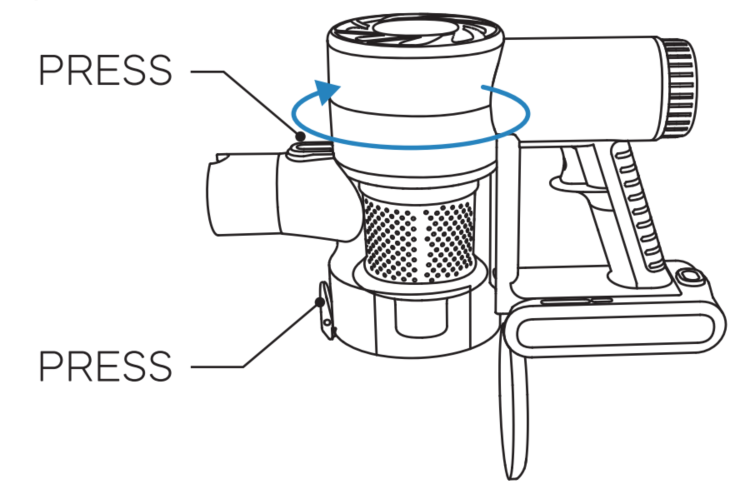
Press the dust cup lid release button at the bottom of the dust cup to empty the debris.
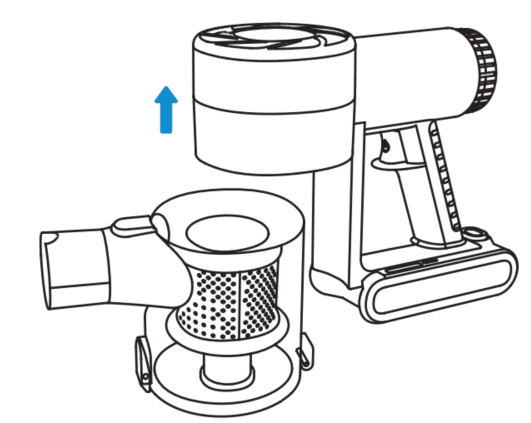
Press the release button on top of the main unit while rotating the dust cup clockwise to detach it from the main unit.
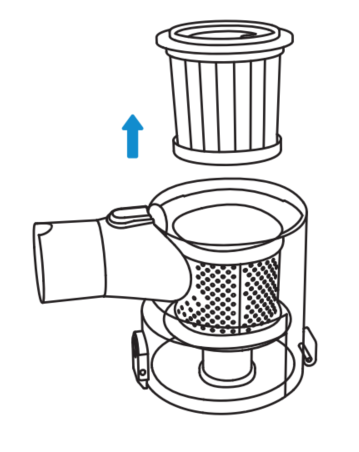
- Remove the HEPA filter from the top of the dust cup.
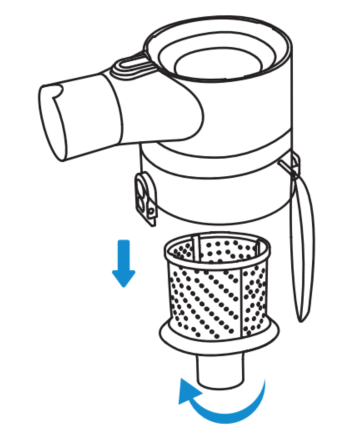
- Separate the metal filter component from the dust cup.
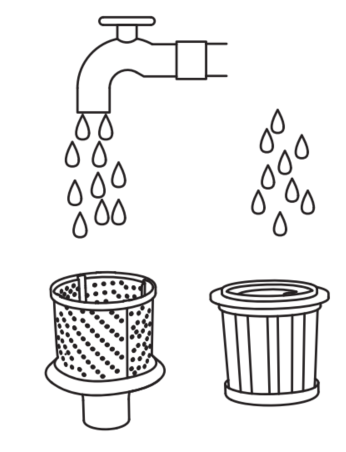
- Wash the metal filter component and HEPA filter with clean water.
- Air-dry in a cool, ventilated place for 24 hours.
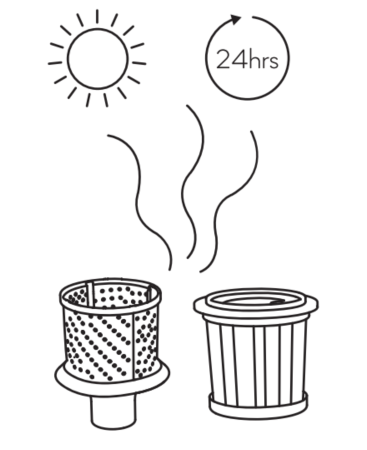
- Ensure all parts are completely dry before reassembly and use.
- Outlet HEPA Cleaning
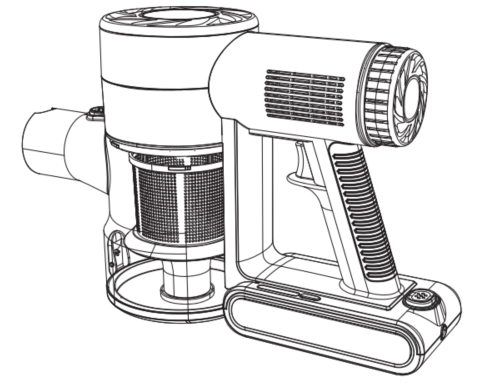
- Turn off the vacuum cleaner and remove the outlet sponge from the back.
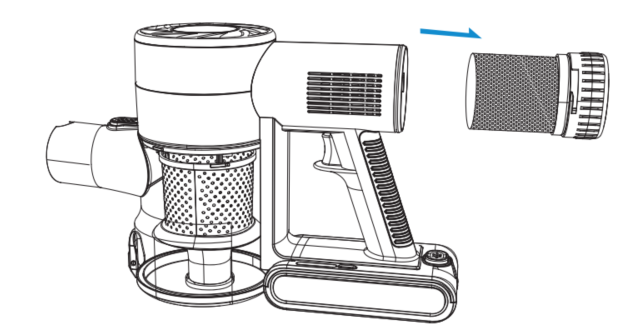
- Tap off the dust from the sponge and rinse it with clean water.
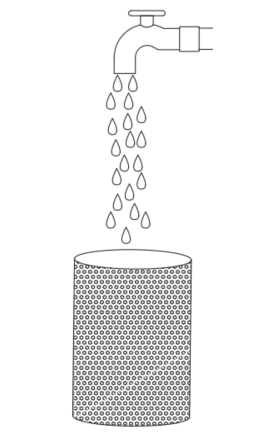
- Allow the sponge to dry completely before reinstalling it at the back of the vacuum cleaner.
- Floor Brush Cleaning
- Turn the floor brush upside down. Slide the roller brush release button to detach the roller brush.
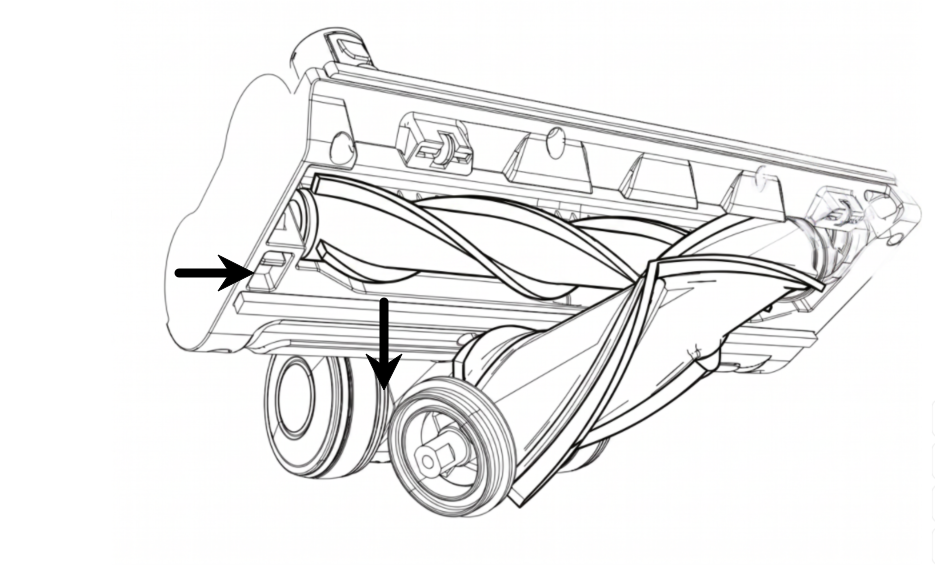
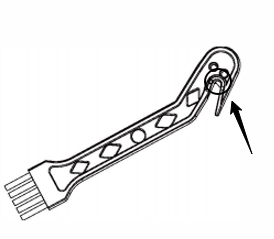
- Remove the roller brush. Use the included cleaning brush; the hidden blade at the back can be used to cut tangled hair.
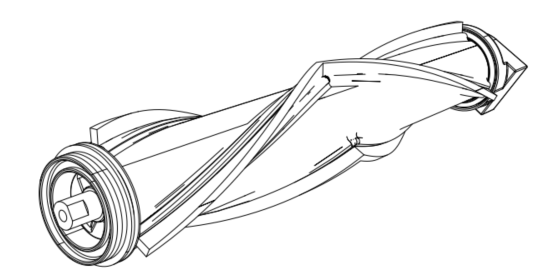
The roller brush can be rinsed with water. Ensure it is completely dry before reinstalling and use.
Note: Do not splash water or other liquids onto the external components of the main unit, dust cup, or floor brush to prevent short circuits. Regularly remove tangled hair from the floor brush and the main unit air inlet to prevent blockages or the roller brush from stopping.
- Precautions
- Read this manual carefully before using the product and keep it for future reference.
- Always use the original adapter to charge the device.
- When the device is not in use, secure it with the included wall mount to prevent it from tipping over.
- Empty the dust cup promptly when it is full.
- Do not use the device without a filter installed.
- Ensure the filter is completely dry after washing before use.
- This product is not intended for use by persons (including children) with reduced physical, sensory, or mental capabilities, or lack of experience and knowledge, unless they have been given supervision or instruction concerning use of the appliance by a person responsible for their safety.
- Do not allow children to play with this product.
- Keep this product out of the reach of children.
- Before use, ensure the rated voltage matches the local power supply. Only use the original or manufacturer-specified charger.
- If the adapter or product is damaged, cracked, or leaking electricity, do not use it. Do not disassemble or modify the product yourself. If any abnormality occurs, contact customer service promptly.
- Do not plug or unplug the device or operate it with wet hands.
- If the device emits smoke, unusual odors, becomes excessively hot, or deforms during operation or charging, stop using it immediately and contact customer service if necessary.
- This product is for household use only. Do not use it for commercial, professional, or any purpose not specified in the manual. Failure to follow instructions will void the warranty, and the manufacturer is not liable for any losses.
- Use the device only under supervision. Do not leave it running unattended. Disconnect the power before leaving, assembling, disassembling, cleaning, or performing maintenance.
- Fully charge the battery before first use or after long-term storage. If not used for an extended period, charge and use it every three months to prevent battery performance degradation.
- Do not use this device to pick up water, cleaning agents, or other liquids.
- Do not use this device to pick up fine particles such as flour, cement, or plaster powder, or large objects like toys or paper balls, as this may damage the motor or clog the vacuum cleaner.
- Do not splash water or other liquids onto or into the device to prevent short circuits.
- Clean the machine with a dry cloth. Avoid using gasoline or thinner that may cause the casing to crack or discolor.
- If the device's runtime decreases due to reduced battery capacity, purchase a new battery pack for replacement.
- Do not use or store the machine in extremely high or low temperatures.
- It is recommended to use the device at room temperature (0-40°C) and store it in a cool, dry place away from prolonged sunlight exposure.
- Unplug the charger when the device is fully charged or during cleaning.
- This battery pack is designed for use only with this device and must be charged with the original charger. Do not use it for other purposes.
- Do not disassemble the battery pack or expose it to liquids to prevent damage or electric shock.
- Do not place the battery pack near high-temperature objects or open flames.
- Do not puncture or damage the battery pack with sharp objects to avoid danger.
VI. Troubleshooting
| Common Issues | Possible Causes | Solutions |
| 3 lights flash rapidly during charging | Battery abnormality | Please contact customer service |
| 3 lights flash slowly during charging | Battery temperature too high | Cool the battery before charging again |
| 3 lights turn off during charging | Fully charged | After fully charged, three lights stay on for 2 minutes before turning off automatically. This is normal |
| 3 lights flash rapidly for 5 seconds during operation | Battery abnormality2. Motor abnormality 3. Dust cup full. | Empty the dust cup first. If issue remains, contact customer service. |
| 3 lights flash slowly for 5 seconds during operation | Battery temperature too high 2. Battery abnormality | Restart the machine after 30 minutes. If issue remains, contact customer service. |
| Low suction power, unable to pick up debris. | Low battery power. | Fully charge before use. |
| Dust cup or filter sponge clogged. | Empty the dust cup and clean the high-efficiency filter sponge (let it dry before reuse). | |
| Floor brush/conductive tube blocked | Check if the floor brush or conductive tube is blocked, then clean it before use. | |
| Battery drains quickly | The battery pack lithium chip has not completed self-learning | For new machines, perform one full charge-discharge cycle: run on high power until auto shut off, then fully charge to 100% before use (the display will automatically turn off, then use again). |
| Large battery cell voltage difference | If this occurs after 1-2 months of use, replace the battery pack. | |
| Cannot charge | Battery pack defective | Screen not responding (black screen) - replace the battery pack. |
| Floor brush not rotating | Floor brush roller jammed | If the roller is jammed, the roller jam icon on the display will flash. Clean any debris from the roller before use. |
| Conductive tube defective | Insert the floor brush directly into the dust cup. If the brush works normally, replace the conductive tube | |
| Extension tube, floor brush, and main unit is not properly connected | Reinstall the floor brush and conductive tube before use | |
| Battery not fully charging | Adapter defective | Replace the adapter |
| Cannot power on | Switch defective | Replace the main unit |
| Dust cup full | Empty the dust cup before use | |
| Battery pack defective | Replace the battery pack | |
| Cannot power off | Switch defective | Replace the main unit |
| Battery pack defective | Replace the battery pack |